Polymetric setup
Sometimes you might want to have several voices playing in different meters simultaneously. For example, a simple trick to make a piece more entertaining would be to write the drums part in 5/4, and all other voices in 4/4.
However, editing and rearranging that kind of rhythms on a standard 4/4 grid can quickly become a mess.
This page describes how to set up time signatures to avoid getting lost in bars and make piano/pattern roll grids more manageable, even for complex polymeters.
How time signatures work
Time signatures affect how the vertical grid lines are arranged across the canvas, which is to make aligning notes/clips more convenient and provide some visual cue.
Each time signature also defines how the metronome/click track will sound in the time signature’s scope.
There are two kinds of time signatures:
-
Global time signatures, which can be added to the timeline:

-
Per-track time signatures, which can be assigned to any track via menu or
Alt + F2hotkey:
Global time signatures can be dragged all over the timeline, and you can add as many of them as you want (e.g. shift-drag to copy them).
Per-track time signatures are anchored to their track’s position (although they can be dragged within the track’s range, which may be useful, if the track starts off-beat), and you can have exactly one per track.
You might want to use either of two kinds, or both, depending on your setup:
- For simpler pieces, or, if you’re not using the pattern roll at all, you might only need global, timeline-based time signatures, often a single one.
- If using the pattern roll and have lots of clips, try assigning time signatures to some parts of your piece in addition to global time signature(s) for more flexibility - see below the examples of how the timeline switches between them.
- Finally, if you’re making complex rhythms, you might want to use per-track time signatures only. Even if you’re not making polymeters, time signatures attached to tracks make it easier to rearrange the piece and experiment.
Timeline behavior
Timeline will display global time signatures by default, and override them with time signatures of selected track(s), when possible.
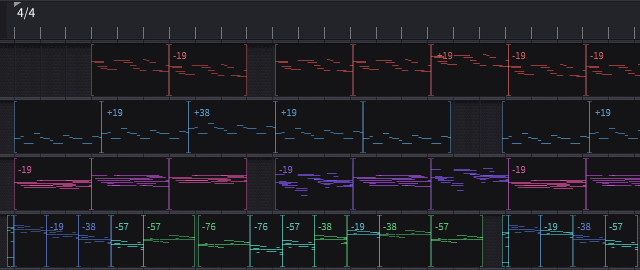
In the pattern roll, it will try to aggregate time signatures for the entire row, assuming that one row is one “voice” (see also track grouping):

In the piano roll, timeline will simply switch to time signature(s) of the edited track, if any:

Limitations
Note that making polytempo is not currently possible: the beat length is the same for all tracks. Time signatures make different bar sizes (and different snaps arrangements within a bar), but the global tempo track(s) affect the project as a whole.
Polyrhythm support is also poor; although you can think of polyrhythms as of polymeters on a smaller scale, that’s not very practical. There is basic support for tuplets (hotkeys Alt + 1 to Alt + 9):

But you can’t edit tuplet parts individually at the moment, which makes them only useful for drums, probably. Hopefully this will be improved in future.
Metronome
The built-in metronome is toggled by Control + M hotkey.
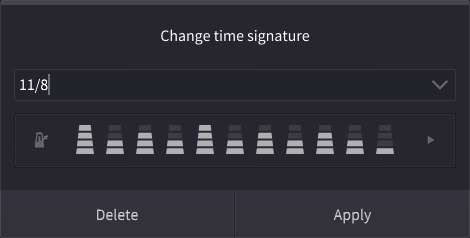
Each time signature has its own metronome scheme: basically a short sequence of different click sounds, which defines how metronome accents are aligned within one bar:

Note that different time signatures with same meter can still have different metronome schemes.
The internal metronome instrument comes with 4 click sounds representing different click accents. You can customize them and pick your own samples in the instrument’s UI:
- either select “Show UI” from the metronome instrument’s menu on the Orchestra Pit page,
- or click on the metronome icon in the time signature dialog (a shortcut to the above).