Introduction
Welcome to the documentation for the Helio project, a free lightweight music sequencer that runs on all major desktop and mobile operating systems.
Helio was designed to save me time struggling with the MIDI editor, so I could focus more on musical ideas. In this documentation, I’ll also try to save time by keeping it as short and simple as possible.
If you notice that something important is missing, send me an email, or file a PR on Github.
Some generated content will be missing if you read this page in the project’s repository, see the full rendered version at docs.helio.fm.
How to read this
If you’re starting out with Helio, just keep reading the Getting Started page to learn the basic concepts of UI navigation, setting up instruments, creating a project, editing and arranging it, and saving your work in the version control.
Otherwise, you might find the editing tips useful: the majority of the nifty tools and hacks are described there.
If you’ve already tinkered with Helio for a while, you’ll probably only need the hotkeys section.
Installation
Helio is released as a single portable executable file, where possible, but installers are also available for some systems. In both flavors it has a small disk footprint (less than 10 Mb) and should run on most available hardware and platform versions.
Portable vs installer
Installers are provided for Windows and Debian-based Linux distributions. The installer version is only required if you want the desktop shortcut and the uninstall tool.
To use the portable version, simply download the compressed archive and unzip it to a folder of your choice.
32 or 64 bits
The only practical difference between the two is that the 64-bit version can only host 64-bit plugins, and the 32-bit version can only host 32-bit plugins.
Helio does not currently support plugin sandboxing or hosting both 32-bit and 64-bit plugins.
Stable build or development build
The stable builds are supposed to be more reliable, but they are updated less frequently. You can keep up to date on the latest changes in stable builds through the release notes. Install the development build if you want to test new features or verify bug fixes.
The documentation is not versioned at the moment, and some of the features described at docs.helio.fm may be present only in the development build.
Used directories
Helio keeps all files in two directories: one for project files, and another for configuration files.
The configuration directory
All configuration files are created on the first start under the user application data directory. The directory location is platform-dependent:
- Windows: %APPDATA%\Helio
- macOS: ~/Library/Application Support/Helio
- Linux: ~/.config/Helio
The projects directory
The project files are saved to the user’s default documents folder in the Helio subfolder. This directory’s location is also platform-dependent:
- Windows: %HOMEPATH%\Helio (for example, “c:\Users\Peter\Documents\Helio")
- macOS: ~/Documents/Helio
- Linux: ~/Documents/Helio
Building from source
Building the app from source will require a C++17 compiler, e.g. GCC 9 or Clang 5 on Linux, Visual Studio 2017 on Windows, or Xcode 9.4 on macOS.
Minimum deployment targets are:
- Windows: Windows Vista
- macOS: macOS 10.7
- Linux: mainstream distributions
Basic build instructions
- Clone with submodules:
git clone --recursive https://github.com/helio-fm/helio-sequencer.git. - Install dependencies:
- On Windows, get ASIO SDK (which can’t be redistributed in this project due to licensing restrictions, but you may use
ThirdParty/ASIO/get_asio_sdk.ps1powershell script to download and extract the SDK source). - On Linux, you’ll need to have the following packages installed:
libfreetype6-dev libx11-dev libxinerama-dev libxrandr-dev libxcursor-dev libxcomposite-dev mesa-common-dev freeglut3-dev libasound2-dev libjack-dev libc++-dev; the makefile assumes you’ve set up eitherexport CONFIG=Debug,export CONFIG=Release32orexport CONFIG=Release64before youmake.
- On Windows, get ASIO SDK (which can’t be redistributed in this project due to licensing restrictions, but you may use
- Pick the right project for your OS from the
Projectsdirectory and build.
Release notes
Helio features and updates
All notable changes to this project will be documented in this file. For more detailed info, please see the git log.
Version 3.17
- Removed update checks and project sync features from desktop builds, the app is now offline on both desktop and mobile platforms
- Added initial support for keyboard-only editing in the sequencer, more hotkeys for menus, pop-ups, and dialogs
- More UI performance improvements
- Added more translations
- Desktop platforms: added support for back/forward mouse buttons, fixed VST3 plugin windowing issues, misc fixes in plugin scanning
- Mobile platforms: enabled an option to render to OGG format, QoL fixes for the velocity editor panel
- Android: fixed layout flickering on app start
- iOS: enabled all screen orientations on iPads
Version 3.16
- Improved UI performance in the piano roll, fixed glitches, added x1.25 UI scaling option
- Tidied up the built-in scales list and added more microtonal scales
- Transposing an entire project via project refactoring menu now also updates all key signatures
- Added next/previous preset buttons for the key/time signature dialogs, and the built-in SoundFont player’s preset selection
- Fixed parametric modifiers not updating when the harmonic context changes
- Mobile platforms: made dialog boxes fit better on small screens
- iOS: new projects are always created in the app’s documents folder to avoid confusion, fixed crashes on adding AudioUnit effects to instruments
Version 3.15
- Added an option to display note names in either German or Fixed Do notation (C-D-E or Do-Re-Mi); flats/sharps are now displayed as icons rather than ASCII symbols
- Added two colour schemes with higher contrast
- Desktop platforms: window position and size are persisted, fixed undo issues in the chord compiler
- macOS: fixed scanning custom plugin folders and font switching issues
- Mobile platforms: sidebars can be stretched sideways to avoid being cut-off by the display notch, scrolling the settings page should now be more convenient
- iOS: project files were inaccessible via the file picker, and the SoundFont player lost track of SoundFont files between sessions, fixed a couple of iOS-specific crashes
- Misc QoL tweaks: better support for the “no UI animations” mode, the built-in SoundFont player displays the program selection control as a combo-box, better support for the knife tool
Version 3.14
- The built-in SoundFont player now supports microtonal temperaments with no setup
- The built-in SoundFont player supports SF3 format with OGG/FLAC sample compression
- Fixed edge cases when converting between temperaments
- Fixed MIDI export for offbeat tracks
- Orchestra pit: the plugins list is now searchable, and table sorting is persistent
- Mobile platforms: added scrollable scale editor for microtonal temperaments for phone screens, added sidebar buttons for tuning and transposing clips in the pattern roll, enabled background audio on iOS
- Fixed misc annoyances: fixed crashes on pasting empty/invalid data, fixed undo issues after VCS checkouts, fixed edge cases when switching the editable scope
Version 3.13
- Added initial support for parametric modifiers: arpeggiators and most of the refactoring options can now be applied in a non-destructive way
- Reworked note naming to be more compatible with traditional notation language, at least for chromatic scales in 12-tone temperament
- Fixed arpeggiators so that they finally work as intended
- Fixed sending events to MIDI output, also the ‘MIDI output’ instrument is now created automatically
- Implemented drawing freeform lasso with Control-dragging
- Added new UI flags to toggle following playhead, and to lock current zoom level and prevent auto-zooming
- Double-pressing Space/Enter or long-tapping the play button speeds up playback by 1.5x
- MIDI import now groups the imported events into tracks by channels and controller numbers
- More QoL fixes for mobile platforms, more SoundFont and LV2 bugs fixed, more UI tidying up
Version 3.12
- This is mostly a mobile fixes release: reworked layouts for phone screens, fixed SoundFont player bugs, fixed import/export crashes, added adaptive and themed icons on Android, reworked multi-touch (better late than never)
- Added automations editor panel supporting hand-drawing custom curves with the pen tool
- Volume editor panel now also supports hand-drawing custom ramps and is more consistent with edit modes
- Both the piano roll and the pattern roll can display the volume editor and the automations editor
- Added support for MIDI channels (better late than never)
- Piano roll: the lasso component cannot be zero-width or zero-height, dragged notes snap to the original note’s beat, the default note length and volume are persisted
- Version control: switching to another version now works like a hard reset
- Added commands to shift tempo tracks 1 BPM up/down (hotkeys Shift + and Shift -)
- Fixed re-adjusting MIDI input from 12-tone keyboards for microtonality
- The number of saved undo actions is now configurable
- Minor feature cutting: removed the updates info control, the legacy undocumented scale preview panel and the alternative spectrogram view
Version 3.11
- Added built-in SoundFont player instrument
- Migrated to JUCE 7 and enabled experimental support for hosting LV2 plugins
- Microtonality: added built-in 26-edo temperament, fixed Alt + Up/Down transposition hotkeys for microtonal layouts, fixed Pianoteq keyboard mapping presets to match A440 on default settings
- Piano roll: added staccato and legato commands (Alt + S and Alt + L hotkeys), clicking a single note makes that note’s velocity and length the default, holding Alt disables snapping to barlines
- Pattern roll: improved solo mode indication (implicitly muted tracks are dimmed)
- Tempo dialog: adjusting the tempo with mouse wheel
- Render dialog: preview the waveform while rendering
- Fixed regressions in computing time codes and in the audio rendering code
Version 3.10
- Added built-in metronome, toggled by Control + M hotkey, each time signature now has its own editable metronome scheme
- Added an option to select the MIDI output device
- Added an option to scale the UI x1.5 or x2
- Made the update checks optional
- Updated the app icon
- Fixed renaming or recoloring multiple tracks in the pattern roll
- Minor fixes: double click on a tempo track opens “set one tempo” dialog, fixed some grid arrangement glitches and inaccurate time signature alignment, fixed zooming out in large projects, fixed inactive notes blocking double-clicks on the roll
Version 3.9
- Added per-track time signatures: hotkey Alt + F2 to add a time signature anchored to track’s position
- Made retrograde hotkey work in the pattern roll, re-ordering all selected clips backwards for each row
- Implemented auto-fitting the roll view range by zooming it out until it “clicks”
- Added support for nonoctave tunings (only affect the built-in instrument at the moment)
- Minor tweaks: more conventional right click menu behavior on multiple selection, improved aligning the dragged clips in the pattern roll, long-overdue UI fixes for smaller phone screens
Version 3.8
- Added in-scale transposition commands, hotkeys Alt + Up and Alt + Down
- Implemented recording MIDI from a 12-tone keyboard in any temperament
- Improved the pen tool: delete notes and clips with right mouse button
- Improved the knife tool: merge two clips into one or join notes with right mouse button (long tap on mobile platforms)
- Added “save preset” button in the key signature editor
- Mini-map improvements: draw a zoom region with left mouse button and pan the stretched mini-map with right mouse button
- Minor tweaks: allowed “natural” scrolling in the rolls on macOS, improved file choosers for mobile platforms, updated 19-edo settings, re-ordered the edit modes a bit
Version 3.7
- Made the playback loop markers draggable
- Added 19-edo to built-in temperaments
- Added keyboard mapping presets menu (with some built-in multi-channel mappings for Pianoteq), allowing to save your own presets
- Lasso improvements: added a cool selection range dashed indicator in the roll headers and fixed selection behavior when deselecting items with Alt
- Mouse wheel control improvements: added support for mice with dual-axis wheels and added a separate “vertical zooming by default” UI option
- Fixed missing note-offs when editing, which broke some VST3 plugins
- Facelifted the default color schemes
- Minor convenience tweaks: global zooming with Alt modifier key, toggling mini-map mode with a click at scroller’s free area, transposing by perfect fifth or equivalent with Control + Shift + Up/Down hotkeys
Version 3.6
- Fixed VST3 plugins showing black screen and made minor improvements in instrument management
- Fixed loading the invalid audio settings (which caused issues when using JACK)
- Fixed the audio setting page not always updating correctly
- Many minor UI tweaks: made “move notes” menus more convenient so that closer clips are shown first, fixed tooltips in the chord tool, fixed updating with the editable scope in velocity map, fixed the pen tool behavior on mobile platforms
Version 3.5
- Disabled all network-related features on mobile platforms
- Added two UI flags for better control over mouse wheel behavior, notably for using mouse wheel for panning instead of zooming by default
- Added UI option to disable most of the editor animations
- Added UI flag to change the bottom mini-map appearance (toggled by B hotkey)
- Added tooltips to sidebar buttons
- UI improvements: fixed the pattern roll not updating with time signature changes, prettied up the cut point marks for the knife tool and note resizers on mobile platforms
- Implemented duplicating automation tracks in the pattern roll
- Fixed the project length being calculated incorrectly for rendering
- Fixed font scanning so the app shouldn’t freeze on the very first run
Version 3.4
- Added horizontal scrolling using shift + mouse wheel
- When exporting MIDI, the track segments are grouped in the same way as you see them grouped in the pattern roll
- All instances of selected clips in the pattern roll are now highlighted with the dashed header
- Added ‘+’ button on the tools sidebar, which shows the new track dialog, or the menu to choose the instrument first; using the quill tool on any empty row will invoke the same menu or dialog
- Fixed minor UI glitches on MIDI import and checkout, fixed the track range indicator not always updated properly, tweaked hotkeys a bit
- Added a menu to move selected notes to another track, also available in the command palette with ‘:’ shortcut
- Better support for file choosers on mobile platforms to allow exporting MIDI file to a custom location, e.g. iCloud container
Version 3.3
- Added initial support for custom temperaments, the default list includes 22-EDO and 31-EDO; added commands to switch temperament or convert a piece into any other temperament
- Added keyboard mapping page for instruments, allowing to overcome the limits of MIDI 1.0 for microtonal music, or just to re-map any key for whatever purposes
- Forgive me father, for I have synthed: removed the built-in piano samples to reduce binary size (my OCD appreciates this immensely), and added a simple sine-like synth which works in any n-tone equal temperament out of the box; it sucks, but hopefully it will be improved in future
- Added a command to switch to the most visible track/clip in the viewport, hotkey F3
- Fixed note previewing for some instruments: now it sends note-off events after a delay
- Minor UI tweaks: made animations a bit shorter and sharper, fixed several focus issues when deleting tracks, the resizable edge in note components now depends on the note width
Version 3.2
- Added tempo dialog with “tap tempo” control, invoked either by clicking at tempo track nodes, or by hitting “Set one tempo” menu item in project->refactor menu or tempo track context menu
- Fixed the old and super annoying rows tiling bug in OpenGL mode
- Context menus in the sequencer are now only available via long right-click: instant rclick menu often gets in the way when misclicking / trying to switch to another track
- Playback: will compute states of all present CC automations at the playhead position and apply them when playback starts, which helps a lot if you use pedal tracks or similar automations
- Orchestra pit: if some instrument hasn’t loaded properly (e.g. plugin file missing), then the last valid instrument settings will be preserved in hope that it can be loaded correctly in the next launches; invalid instruments are shown as greyed out in the orchestra pit page, they also can be deleted, or made valid by adding a plugin node
- Key signature dialog: right-click on any key will play the key
- Lots of UI updates: tidied up the project info page and the dashboard, updated the colours list and the breadcrumbs control
Version 3.1
- Added right-click context menus in the sequencer, version control and orchestra pit pages: the menu content is always the same as in the breadcrumbs control tail menu
- Added a command to bring up the current instrument’s window, hotkey F4
- Fixed some more UI glitches - most notably, focusing the piano roll scope on a track
- Minor bugfixes in MIDI recording
Version 3.0
- Added initial support for MIDI recording, hotkey F12
- Added initial support for looping the playback over the selected scope, hotkey F11
- Added quantization commands
- Made annotations lengths adjustable
- Added timeout for scanning fonts on the first run to avoid the app hanging on some systems
- Minor UI updates for a prettier look and less glitching; added the command palette button in the headline and the timeline repeat sign
- More tech debt has been paid down, this part of the update will hopefully be invisible
- Added some documentation
Version 2.5
- This is mostly a bugfix release: addressed some UX inconveniences and fixed a stupid crash
- Added hotkeys for tweaking lengths of selected notes; also adding a note with a modifier key inserts a new note in a dragging mode
- Made all hotkey-based beat/length-shift actions depend on the current zoom level
- Implemented duplicating tracks in an interactive manner
- Made all dialogs draggable
- Enabled hardened runtime for macOS builds
Version 2.4
- Added the command palette aka goto anything, toggled by ~ hotkey: the default mode is used for quick access to commands for the current context, the ‘/’ mode is used for quick access to projects list, ‘@’ mode to go to any timeline event or focus on any clip, and ‘!’ mode to construct chords from the text description (still experimental)
- Added an option to display note names for a visual cue, toggled by the default hotkey ‘g’ (for ‘guides’)
- Added an option to disable scales highlighting, toggled by the default hotkey ‘h’ (for ‘highlighting’)
- Removed some shame from my heart by refactoring ugly bits of serialization code, also removed the legacy serializer which definitely did not spark joy, thus dropped support for v1 file format
- Made it possible to control volume ramping amount with mouse wheel in the velocity map
- Fixed some issues with switching between system/custom title bar
- Fine-tuned the performance and piano roll behaviour
- Added notarization for macOS builds
Version 2.3
- Added support for aug/dim chords descriptions
- Allow switching between custom and native title bar on Windows and Linux
- Also display breadcrumbs in the title bar if possible to save some screen space
- Added retrograde and melodic inversion to selection refactoring menu
- Added shift-drag-to-copy for all timeline events
- Go to next/previous anchor now jumps over clips in pattern mode
- Reworked midi import, should fix importing controller tracks, key/time signatures and track names
- Made plugins search less likely to stuck and cancellable with a click or escape keypress
Version 2.2
- Long-overdue implementation of inline velocity map/editor (toggled by V button)
- Arpeggiators can use advanced options, like length multiplier, inversion, randomness level (shift/ctrl/atl + arp button)
- Refactored instruments managements to fix rare crashes on the orchestra pit page
- Fixed shift-drag-to-copy for notes, which was broken even before v2 release
- Fixed automation curves interpolation
- Some refactorings for lesser memory usage
Version 2.1
- Clips now can be muted/soloed
- Patterns can be grouped by name/colour/instrument
- Notes can be split into triplets/quadruplets/quintuplets/etc
- Binary size is much smaller and more optimized overall, due to unity build
Version 2.0
- Spent entire 2018 paying off the tech debt of version 1 (or tech mortgage, if you will), which was pretty much of a POC
- Changed bundle ids to more consistent ones
- Rewritten the backend side API’s from scratch
- LOTS of refactorings, performance/stability fixes, etc - hopefully all future updates will be just incremental improvements
Getting started
UI overview
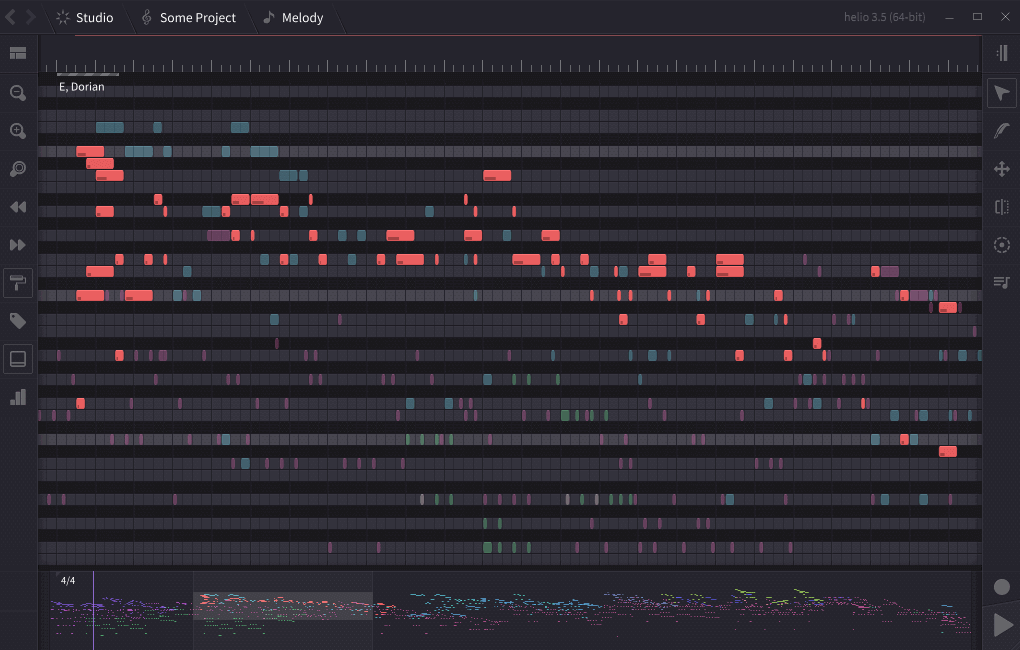
This is how the sequencer page looks like in Helio, as of version 3. There are other pages besides this, but you’ll spend majority of your time in the sequencer.
The UI is divided into the following sections:
- the breadcrumb navigation control is on the top,
- the editor canvas is in the middle,
- the project mini-map is on the bottom,
- the track navigation tools are in the left sidebar,
- the editing tools are in the right sidebar.
They will be described below, but, before you dive in,
A little backstory and a couple of silly excuses
This project arose from the need for an advanced MIDI editor, something like Sublime Text for music.
I was also sick and tired of visual overstimulation, which most music tools tend to have more and more (just google some pictures for “digital audio workstation”). One of my main goals was to create a tool that feels right: one with an uncluttered and non-distractive user interface.
So, in general, I try to avoid adding UI controls if there is a way to do without them. As it turned out, though, there are a couple of challenges with that approach (for which I don’t see simple solutions, UX design is hard):
- one challenge is to keep the UI simple, even minimalistic, while also not being disorienting,
- another challenge is to keep the UI look and behave consistently across all platforms, both desktop and mobile.
If something feels misleading to you, please report it to help identify the main friction points.
Workspace navigation
The breadcrumb control on the top is responsible for navigating the workspace.
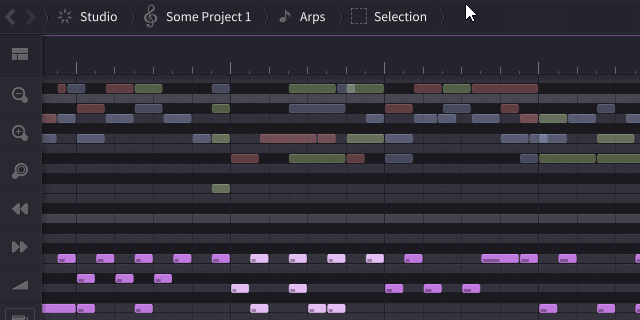
All items in the breadcrumb control have their own context menus. The Studio root node contains all available pages and open projects:
Workspace structure
Breadcrumbs show the hierarchy of the current page you’re on.
Under the hood, the workspace is a tree-like structure that looks like this:
- Dashboard for the projects list, a fancy logo, and a couple of buttons
- Settings for choosing a language, audio drivers, playing with UI flags, etc
- Orchestra pit for managing plugins and instruments on the stage
- Instrument 1 page for setting up audio/MIDI routing for all plugins in your instrument
- Instrument 2 page and so on
- Project 1 page for the basic project info: title, author, etc
- Piano roll for editing
- Pattern roll for arranging
- Version control page
- Project 2 page
- Piano roll
- ..and so on
Creating a Project
When you first launch Helio, you should see a simple example project open in the editor. Here are a few steps that can help you get started:
- to rename the project, click
Example Projectin the breadcrumb control, and you’ll be taken to the project info page, where you can edit some details, - after renaming, return to the piano roll page by pressing
Alt + Left Arrowor by pressing the back button on the top left. - you can only edit one track at a time: use right-click (or long tap on mobile) to switch to another track; holding any modifier key while switching will also adjust the zoom level so that the entire track fits the viewport,
- to play with arrangement, switch to the pattern roll by pressing
TaborPage Down, or by clicking the uppermost button in the left sidebar, - double-click any clip to return to the piano roll with that clip in focus; at this point you should get an idea of how the sequencer layout works.
To start a new project from scratch, go to the dashboard by pressing the Home key, or clicking the Studio node in the breadcrumbs. There you’ll see a list of recent projects, and a couple of buttons:
- create an empty project,
- open an existing project (this also imports MIDI files).
Switching between projects
There are several ways:
- use the
/hotkey to display the projects list in the command palette, - or hover the
Studioitem in the breadcrumb control to display a menu with all open projects, - the back and forward buttons are also useful at times; the associated hotkeys are
Alt + Cursor LeftandAlt + Cursor Right.
Instruments
Instruments management
The most notable difference between Helio’s instrument management and that of the majority of DAWs and sequencers is that Helio separates instruments from projects.
Each project only stores the instrument references, so the instrument settings are saved in the application workspace settings rather than the project files.
Instruments are created and set up in a separate page, called Orchestra Pit.
The reason for implementing it this way was that in my workflow, I tend to use the same instruments for all of my projects. The app was designed primarily as a sketching and prototyping tool, and I usually have lots of sketches, so all the operations involving switching between projects, opening and closing them, or checking out in the version control, were ought to be as fast as possible, and not eat up all the memory.
Helio is probably not the best choice if your setup requires you to always have different instruments or instrument settings for each project, or if you want the project file to contain the instrument details.
On the other hand, if you happen to have an instrument library you’re comfortable with (e.g. VSL or a selected soundfonts collection), and you want to set it up once and forget it, you’ll probably like this approach.
Orchestra pit page
The orchestra pit page has two sections:
- all found plugins are displayed on the left side,
- all instruments on stage, created from those plugins, are on the right.
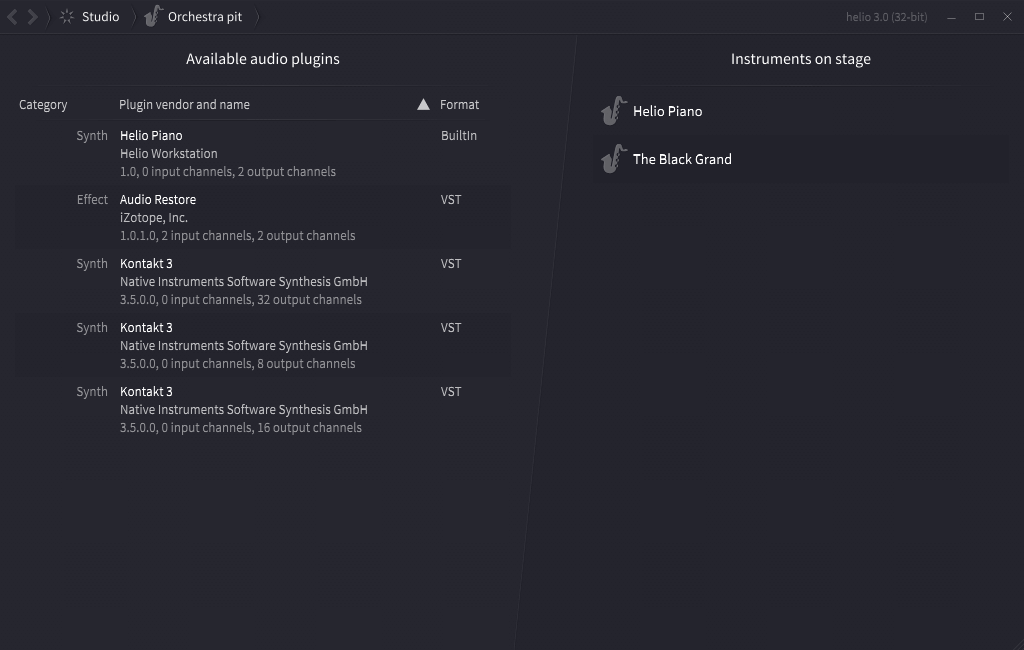
First, you want to scan for available plugins, there are two options in the orchestra pit menu:
- either pick a specific folder to scan (note that all subfolder will be scanned as well),
- or perform a global plugins scan: it tries to guess the most possible locations, e.g. Steinberg folders in Program Files, and scans them and all their subfolders.
Once you have a list of plugins, create an instrument using the plugin menu, so that it appears on the stage and can be assigned to your tracks.
Instrument details and routing
Double-click on any of the instruments to get to the instrument details page.
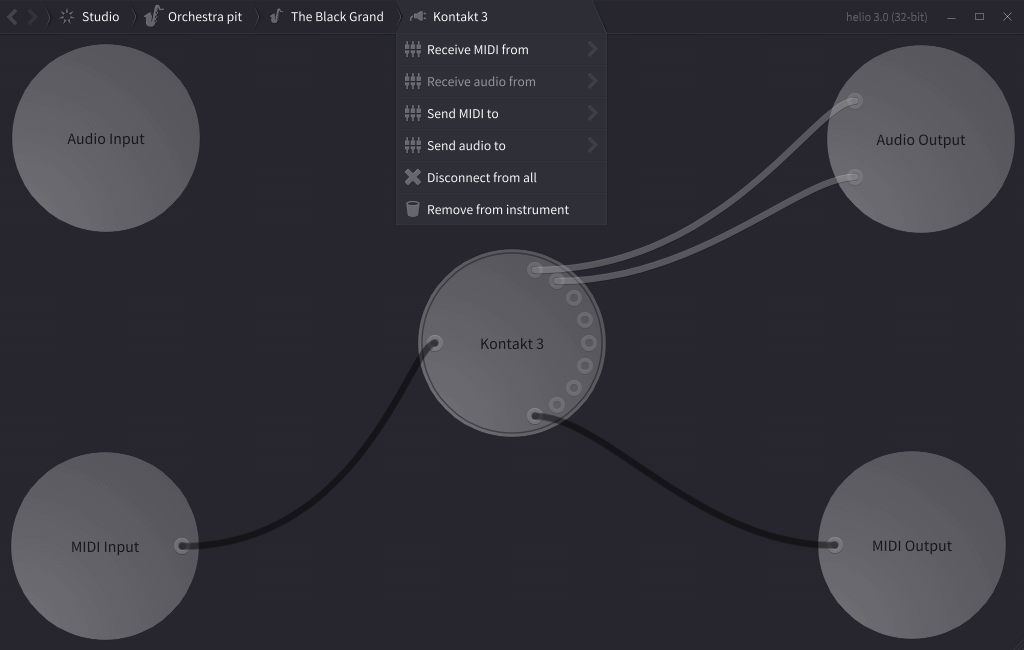
Most of the actions here, including audio and MIDI routing, are available through the menus.
Interacting with nodes:
- left-click on the node will create a plugin window, it it has one, or just select it, if it doesn’t,
- right-click on the node will just select it,
- use mouse drag to connect sockets representing audio and MIDI inputs and outputs.
While it is possible to set up a multi-plugin instrument with audio/MIDI routing in Helio, the convenience of the instrument page was not of a particular concern: the development is rather focused on the sequencer functionality. If you are running it under Linux, it might be a good idea to add Carla as an instrument, and use it to manage VST/whatever plugins and routing.
Default instruments
A few built-in instruments are created automatically and cannot be removed:
- the “Helio Default” instrument is a simple sine wave voice that supports all built-in temperaments with no setup; aside from being the default instrument, it is used to preview scales in the key signature dialog,
- the “MIDI Output” instrument generates no sound but sends all events, except meta-events, to the MIDI output specified on the settings page,
- the “Metronome” instrument gives you the option to select custom metronome samples.
Apart from those, Helio includes the built-in SoundFont player instrument which can be found in the plugins list after scanning. It can load SF2 format and SF3 format with OGG/FLAC sample compression and supports microtonal temperaments. On mobile platforms it will be automatically added to the orchestra pit on the first launch.
Editing and arranging
Timeline
On the top of the editor canvas, there’s a timeline control. To interact with it:
- left click at the timeline to position the playhead,
- middle-click to start the playback from that position,
- right click to invoke the timeline events menu:

Timeline events include annotations, key signatures and time signatures, and they don’t affect the playback of your piece in any way, they are rather meant to provide a visual cue.
Manipulating the timeline events:
- click on any event to focus the playhead at its position,
- once focused, click again to edit or delete the event (displays a dialog),
- drag to move, or shift-drag to duplicate the event.
Annotations
Annotations are just text markers with optionally adjustable length:

Right-click on the annotation selects all notes of the active track up to the next annotation.
Time signatures
Time signatures simply define the way the vertical grid lines are aligned in the roll:

Right-click on the time signature selects all notes of the active track up to the next time signature.
If you need to manage complex rhythms, see this page.
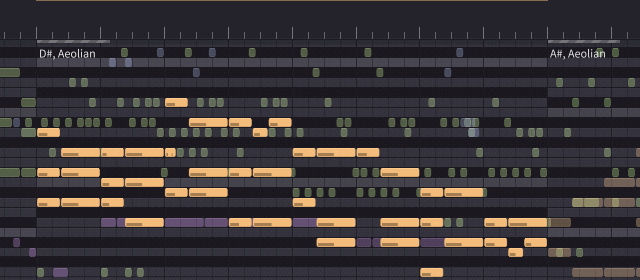
Key signatures
Key signatures affect the way the rows are highlighted in the piano roll (this effect can be disabled on the setting page):
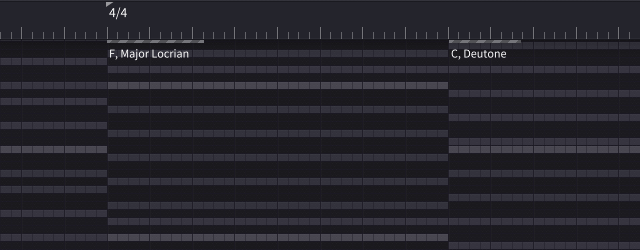
Key signatures also affect note naming, and various tools like arpeggiators and the chord tool rely on key signatures to figure out the harmonic context.
A key signature is a combination of the root key and the scale:
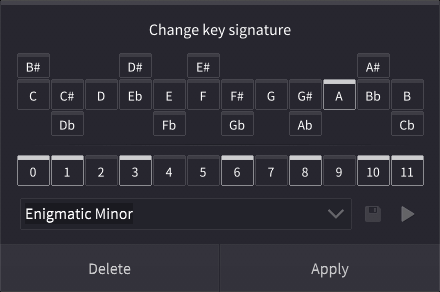
Tip: right-click on any key button to preview it.
The root key selection allows you to pick one of the key’s enharmonic equivalents, which only affects note naming to provide better compatibility with traditional notation language.
A scale is defined as a subset of the current temperament’s octave keys. While this is not the same as how traditional notation defines, say, diatonic scales, this approach is flexible and makes more sense for the piano roll.
Reprise
If you have enabled the playback loop over the selected scope, timeline will display the repeat signs:

The reprise also affects rendering to audio, it can be used as a hack to render a few bars of the project.
Left sidebar
This sidebar is responsible for track navigation and UI control.
Most buttons on the sidebars have keyboard shortcuts, which makes them kinda redundant, but they are displayed anyway for the sake of having a consistent UI on mobiles or touch-screen laptops, where you don’t have hotkeys.
 — switch the editor view between the piano roll and the pattern roll (
Tab), — zoom out (
Shift + Z), zoom in (Z), and zoom selection (Control + Tab), — lock the current zoom level(
Alt + Z), — jump over the timeline events (
,and.), — toggle the volume/automation editors (
V), — toggle displaying note name guides for a visual cue,
 — a simple audio output view.
Right sidebar
This sidebar is responsible for editing tools and playback control:
 — toggle the playback loop over the selection (
F11), — edit modes (
1,2,3), — undo/redo,
 — other tools - the chord tool, arpeggiators(if available), and metronome,
 — playback (
SpaceorEnter) and recording (F12) control.
Piano roll
The piano roll always limits the editable scope to a single track. You will see all other tracks in a semi-transparent ghost mode. Most common interactions with the piano roll canvas are:
- right-click (or long-tap) on the inactive note to focus the editor to another track,
- right-drag the empty space to pan the canvas:

Interacting with piano roll also depends on the current edit mode:
Edit modes
- normal mode to manage selection and edit notes,
- pen mode to add and edit notes,
- alternatively, use it to delete notes or clips with right mouse button,
- knife mode: cuts notes in the piano roll, cuts tracks in the pattern roll,
- alternatively, use it to merge tracks or notes with right mouse button,
- drag-only mode: an auxiliary mode, hold
Spaceto toggle it temporarily, - selection mode is only displayed on mobile platforms.
All notes, when edited, are aligned to the grid. The grid resolution (the density of bar lines) depends on the zoom level and supports up to 1/64 notes. Tip: holding Alt while editing notes disables snapping to the grid.
All edits are undoable, and there is no limit to the number of undo actions available until the app is restarted. Additionally, each project saves the last 16 undo actions (32 on mobile platforms), which remain undoable after restarting the app. This limit can be changed by editing the main configuration file.
All changes are saved automatically: on exit, and on a timeout after the last change.
The editor relies heavily on hotkeys; feel free to explore available actions by browsing breadcrumb control menus or command palette.
Adding new tracks
Add new tracks by duplicating the existing ones (F5), or via project menu, or by cutting tracks with the knife tool in the pattern roll.
Volume and automation editors
The bottom panel (toggled by V hotkey) combines the volume editor and the automation editor:

(the piano roll allows you to manually switch between volume and automation tracks, while the pattern roll switches the editor type based on the selected clip)
The volume editor, like the piano roll, restricts its editable scope to the active clip. Furthermore, if any notes in the roll are selected, the editable scope is limited to the selection, making it easier to fine-tune and draw more complex ramps for different sections of the track. On mobile platforms, this panel is the main way to edit volume; on desktop platforms, you can also adjust note volumes in the piano roll using the middle mouse button and the + and - hotkeys on the numpad.
The automation editor’s editable scope is limited to the active clip and the selected controller. The active clip is determined by the pattern roll’s selection or by the closest range intersection with the piano roll’s active clip.
Unlike automation clips in the pattern roll, the automation editor allows you to use the pen tool to hand-draw custom curves for curve automations.
Both the volume editor and the automation editor currently only support the default edit mode and the pen tool (no selection or knife tool).
MIDI recording
The record button (hotkey F12) will try to auto-detect the available and enabled MIDI input device, or will provide a selection if there are multiple (the choice is “remembered” and can be changed later in the settings page):

If the recording mode is on, but playback has not yet started, it will wait until it receives the first MIDI event and start recording & playback.
In the piano roll mode, it always records to the selected track/clip:

In the pattern roll, it either records to the selected track/clip, or if no piano clip is selected, it adds one once the recording begins.
Pattern roll
You don’t necessarily need that editor, Helio was designed to be a hybrid linear-based/pattern-based sequencer, so you could just stay in the piano roll mode and treat your project as one big canvas.
However, the pattern roll is helpful for rearranging experiments:
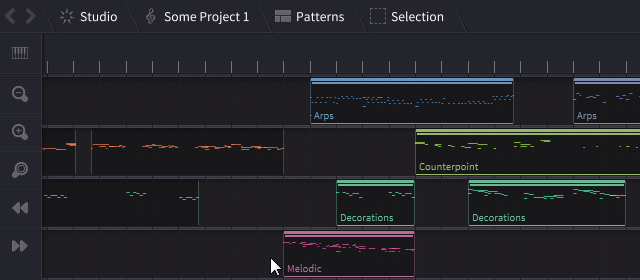
Pattern roll allows you to tweak individual clip parameters: change key offsets and velocity multipliers, or apply parametric modifiers to different instances of the same track.
A hack: I often shift the key offset for all clips as a trick to reset my mental state to notice nuances I wasn’t noticing while working on the piece.
See also: track grouping
Global tempo
Pattern roll is also where you can edit various MIDI controller automation tracks, most notably the tempo track(s):

The tempo track, as any other automation track, interpolates the controller value between nodes, and those tiny points are displayed at the exact times each new MIDI event is sent.
To interact with it:
- delete nodes with right click,
- use the pen tool (hotkey
2) to add nodes, - use the cursor tool (hotkey
1) to drag nodes or to adjust the interpolation curve, - click on the node to invoke the tempo dialog to set the exact BPM value, or to set tempo by tapping:
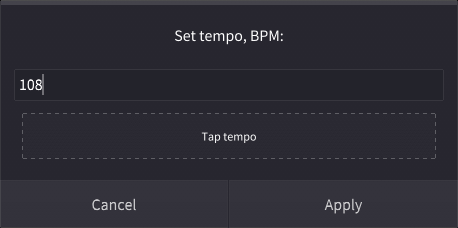
Tip: use the mouse wheel to quickly adjust the tempo in this dialog.
Tip: adding a tempo node while holding any mod key will immediately open the tempo dialog.
Often, you only need one tempo for the whole song - for that, pick “Set one tempo” menu item from the tempo track menu or the project refactoring menu.
Tip: use Shift + and Shift - hotkeys to shift tempo tracks 1 BPM up or down. It affects all selected tempo tracks in the pattern roll, and all tempo tracks in the piano roll.
Mute and solo
Individual clips can be muted via the M hotkey or the context menu in the pattern roll.
Except for automation, all clips can be soloed (with the S hotkey or via the context menu) for the convenience of isolating chunks of notes without disabling the tempo/pedal/etc. automation at the same time.
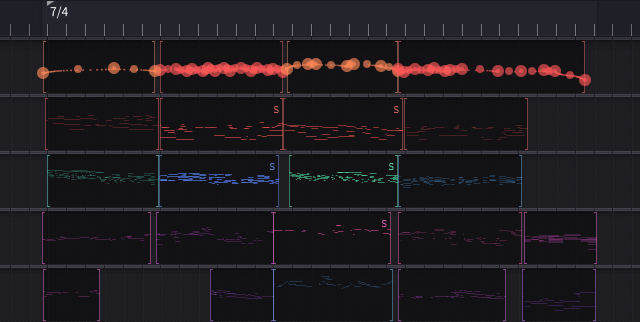
All clips that are explicitly or implicitly muted (muted by others) are displayed as dimmed:
Version control
The concept of version control comes from the software development world. If you’re not familiar with it, you can think of it as of creating “save points” in your project, and tracking changes made since the last time you saved.
The point of having a version control is lowering the friction of committing changes: any changes can be reset if you don’t like them, any saved revision can be restored later. Helio was started as a prototyping tool, a playground for ideas, where you’d want to have several variations of your sketch — hence the idea of having a built-in version control.
Notable use cases are:
- saving a project state at some point, and resetting to any earlier saved state,
- resetting some of the recent changes (think of it as of another mechanism of undoing things),
- hiding and restoring back the most recent changes to get the idea of what have been done since the last commit,
- synchronizing projects across devices.
The UI of the versions page is split in two parts:
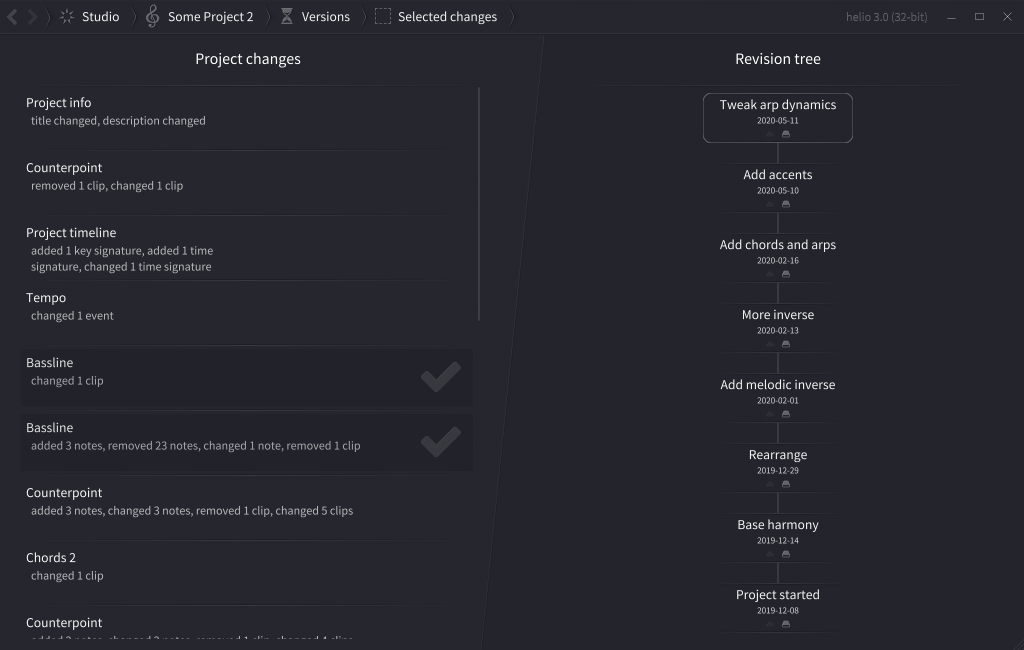
The left side lists all changes in the project, compared to the current revision. Items in the list can be checked and unchecked: both committing and resetting changes are applied selectively.
The right side shows the tree of all revisions that you have saved. Note a couple of icons under each revision: they indicate whether the revision is available locally, or remotely, or both.
Microtonal setup
The piano roll comes with a number of built-in microtonal temperaments and 7-tone scales for each of them, but you can also add your own if necessary.
Helio’s default instrument and built-in SoundFont player work with all temperaments out of the box, with no setup required. Use them if you only want to get familiar with microtonal scales and get a sense of how they sound, and skip the instrument setup steps below.
On mobile platforms, the built-in SoundFont player is likely the only way to have an instrument of choice playing in microtonal temperament. It will automatically recalculate the pitches and ranges of your samples to match the frequencies of the current temperament (see the example).
Setting up instruments
The following describes how to set up external (VST/whatever) instruments such as Pianoteq to work with extended microtonal piano roll.
First, you need to find a plugin that supports microtonal temperaments: here’s a list with some examples.
Then, set up keyboard mapping for that instrument: this must be done both in the plugin’s settings and in the host (this app), to overcome the limitations of MIDI 1.0. The piano roll works as a microtonal keyboard with a wide key range from 0 up to 2048, and it needs to map every key across 16 MIDI channels, of 128 keys each; these MIDI messages are sent to the plugin, which needs to know how to interpret them, or how to map them back from multi-channel data.
Once you’ve added an instrument to the stage, select “Edit keyboard mapping” from the menu. “Keyboard mapping” in this context refers to how MIDI events are transformed when they are routed from the ‘Midi In’ node to the plugin node(s).
Keyboard mapping page
Note: this describes key mapping on the host side, but you’ll need to set it up on the plugin side as well. Unfortunately, can’t help you with that, as it depends on the plugin; see a couple of examples below.
The page allows you to manually adjust key mappings and preview mapped keys by clicking on them. The upper limit for each source channel is set to 2048 keys, this is the maximum number of keys that can fit into 16 target MIDI channels. 2048 keys would be enough to handle temperaments of size up to 192-EDO:
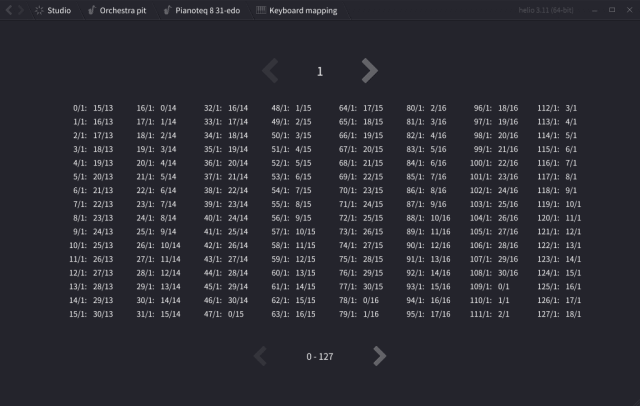
(source channel selection at the top, channel paging at the bottom)
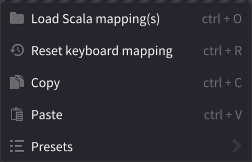
Some additional actions are available via context menu:
- reset to the default modulo-based mapping,
- load custom channel mapping(s) in Scala .kbm format,
- copy/paste the mapping as a string in Helio’s own format into/from the system clipboard,
- select one of the presets or save your own.
While you can set up virtually any custom mapping by hand, there are a couple of (sometimes) more convenient ways, described below.
Scala keyboard mapping
Note: don’t confuse Scala keyboard mapping (.kbm files) with Scala tuning files. The latter are of little use to the piano roll because it doesn’t care about cents and ratios - those are only needed by instruments.
Helio can load Scala keyboard mapping(s), including multichannel mappings which consist of a set of single mapping files with the same name followed by an underscore and a channel number. When you pick a .kbm file, Helio will search for “same_name_*.kbm” files to try to determine whether or not there are multiple channel mappings, and try to load them all.
Keep in mind that the mapping on the sequencer side will be reversed when compared to the same mapping on the instrument side. The piano roll works as a microtonal keyboard that needs to overcome the limitations of MIDI channels by mapping all keys above 127 across multiple channels.
Helio keyboard mapping format
Although the Scala kbm format is flexible, I find it unintuitive, so let me reinvent the wheel and introduce another keyboard mapping format, supposed to be shorter, cleaner and kind of human-readable. You can use it on the keyboard mapping page by simply copying and pasting the mapping as a string.
Let’s start with an example: the entire multi-channel mapping for Pianoteq 31-EDO could be written like this:
0/1:0/14,31+ 31:0/15,31+ 62:0/16,31+ 93:0/1,31+ 124:0/2,31+ 155:0/3,31+ 186:0/4,31+ 217:0/5,31+ 248:0/6,31+ 279:0/7,31+ 310:0/8,31+
Which reads:
- starting from key
0channel1of the source channel, map it to the key0of channel14, then map the next31keys in a sequential manner: for example, key1maps to1/14, key2maps to2/14, and so on, - starting from key
31, map it to the key0of channel15, and, again, map the next31keys sequentially, and so on, - for each next channel the mapping will pick the key from the previous channel and increase the channel number.
Source channel can be omitted, since you probably only need channel 1. E.g., the 22-EDO Pianoteq mapping would look like this:
0:0/14,22+ 22:0/15,22+ 44:0/16,22+ 66:0/1,22+ 88:0/2,22+ 110:0/3,22+ 132:0/4,22+ 154:0/5,22+ 176:0/6,22+ 198:0/7,22+ 220:0/8,22+
For 34-EDO mapping you might want to start one octave lower since the key range is wider:
0:0/13,34+ 34:0/14,34+ 68:0/15,34+ 102:0/16,34+ 136:0/1,34+ 170:0/2,34+ 204:0/3,34+ 238:0/4,34+ 272:0/5,34+ 306:0/6,34+ 340:0/7,34+
Format description
First, the format assumes the default modulo-based mapping:
- keys 0..127 are mapped as they are to channel 1,
- keys 128..255 are mapped as 0..127 in channel 2, and so on.
Everything that differs from the default values is serialized. The serialized mapping is just a string divided by whitespaces into chunks.
Chunks follow this pattern: base:key/channel,key2/channel2,key3/channel3. Which means:
- for the
basekey in the sequencer, the specifiedkey/channelwill be sent to the instrument, - then, for the
base + 1key in the sequencer, the next key and channel will be sent, and so on.
If each next key just incrementally moves by 1, the chunk could be shortened like this: base:key/channel,count+.
// TODO more examples (if you have set up keyboard mappings, which work well for some of your instruments, feel free to share them to improve these docs)
Switching temperaments
Start playing around with microtonal scales by converting any of your twelve-tone pieces (or a new project) into other temperament in the project refactoring menu:
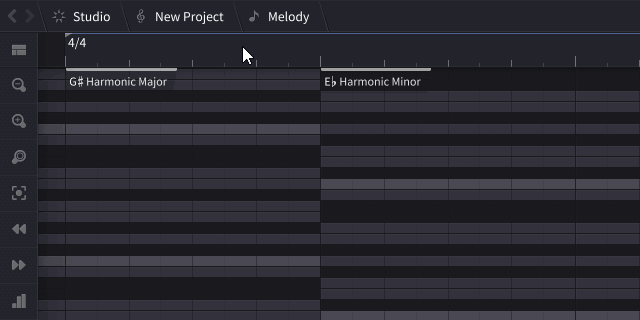
The "Convert to temperament" command will switch the piano roll highlighting, update key signatures and update notes: the conversion is done using chromatic scale approximations (see the temperament model for more information). Helio will use these chromatic maps as the “least common denominators” among temperaments to convert from one to another,
Tip: use this menu with any modifier key pressed for the alternative conversion mode: the converter will assume equal temperaments and use key proportions instead of 12-tone maps for better accuracy.
All tools that work with scales will only show scales with octave size matching current temperament. The piano roll doesn’t distinguish between EDOs and non-EDOs; all that matters is the number of keys per octave, highlighting, key names, and so on.
Limitations
The built-in temperaments list includes 12-edo, 19-edo, 22-edo, 26-edo, and 31-edo.
The built-in scales list only includes 7-tone scales for each of those temperaments because several parts of the app, such as the chord tool and the arpeggiator tool, still assume working with diatonic scales. Given that limitation, using these tools with any built-in temperament or scale makes sense.
Adding a custom temperament
To add custom temperaments and their scales, follow the guide in the сonfigs page. Use the built-in temperaments and scales configuration files as a reference.
Recording MIDI from 12-tone keyboard
The app makes it possible to play and improvise on a standard 12-tone physical keyboard and record MIDI regardless of what temperament is used. For that, it uses the current temperament’s ‘chromatic mapping’ scale to readjust the incoming MIDI data so that all notes sound like their closest 12-tone approximations.
Here is an example of each chromatic scale key played on a 12-tone MIDI keyboard and recorded in a 19-EDO project:

This feature is enabled by default, but it can be disabled in the audio settings section, just below the MIDI input device box. If you’re using a microtonal physical keyboard, uncheck this box so that the app doesn’t mess up MIDI input:

Examples
This section will describe setting up various microtonal plugins in Helio. For now, it’s just a couple of examples, if you managed to make any other plugin work, please share your findings.
Pianoteq
Steps to set up a custom equal temperament:
- In Pianoteq UI, navigate to the advanced tuning page:
- there, create a custom microtonal temperament via the
"Temperament" -> "Make equal temperament..."dropdown menu, - make sure to choose the
"Full rebuild"option nearby instead of the"String tension"option, - in the
"Keyboard mapping" -> "Extended layout for up to 16\*128 notes"dropdown menu, check"Multi-channel MIDI layout", - the
"Main MIDI Channel"option in the same menu should be set to the default"MIDI channel 1".
- there, create a custom microtonal temperament via the
- In Helio UI, navigate to your instrument’s keyboard mapping page:
- there, either select a keyboard mapping preset for your temperament from the menu, if it’s available: for now there are presets for 19-edo, 22-edo, 26-edo and 31-edo,
- or, set up your own multi-channel mapping (see examples above on this page).
For more details on all Pianoteq’s tuning parameters refer to the manual.
Surge XT
Surge synth supports multi-channel mapping since recent versions of Surge XT, so a custom equal temperament can be set up similarly:
- In the main menu, open the tuning settings submenu and check these two options there:
"Use MIDI channel for octave shift""Tuning applied at MIDI input"
- From the same tuning submenu, load the Scala tuning (Surge installation provides a set of equal temperament tunings),
- Navigate to your instrument’s keyboard mapping page in Helio UI and choose a keyboard mapping preset; the same Pianoteq multi-channel presets will work for Surge.
Polymetric setup
Sometimes you might want to have several voices playing in different meters simultaneously. For example, a simple trick to make a piece more entertaining would be to write the drums part in 5/4, and all other voices in 4/4.
However, editing and rearranging that kind of rhythms on a standard 4/4 grid can quickly become a mess.
This page describes how to set up time signatures to avoid getting lost in bars and make piano/pattern roll grids more manageable, even for complex polymeters.
How time signatures work
Time signatures affect how the vertical grid lines are arranged across the canvas, which is to make aligning notes/clips more convenient and provide some visual cue.
Each time signature also defines how the metronome/click track will sound in the time signature’s scope.
There are two kinds of time signatures:
-
Global time signatures, which can be added to the timeline:

-
Per-track time signatures, which can be assigned to any track via menu or
Alt + F2hotkey:
Global time signatures can be dragged all over the timeline, and you can add as many of them as you want (e.g. shift-drag to copy them).
Per-track time signatures are anchored to their track’s position (although they can be dragged within the track’s range, which may be useful, if the track starts off-beat), and you can have exactly one per track.
You might want to use either of two kinds, or both, depending on your setup:
- For simpler pieces, or, if you’re not using the pattern roll at all, you might only need global, timeline-based time signatures, often a single one.
- If using the pattern roll and have lots of clips, try assigning time signatures to some parts of your piece in addition to global time signature(s) for more flexibility - see below the examples of how the timeline switches between them.
- Finally, if you’re making complex rhythms, you might want to use per-track time signatures only. Even if you’re not making polymeters, time signatures attached to tracks make it easier to rearrange the piece and experiment.
Timeline behavior
Timeline will display global time signatures by default, and override them with time signatures of selected track(s), when possible.
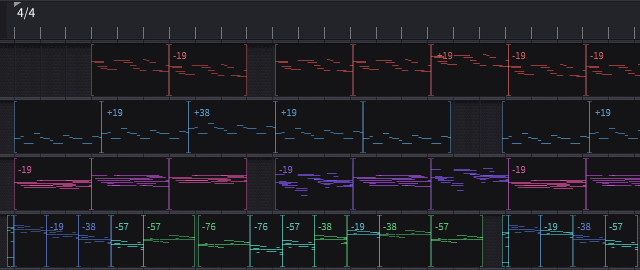
In the pattern roll, it will try to aggregate time signatures for the entire row, assuming that one row is one “voice” (see also track grouping):
In the piano roll, timeline will simply switch to time signature(s) of the edited track, if any:

Limitations
Note that making polytempo is not currently possible: the beat length is the same for all tracks. Time signatures make different bar sizes (and different snaps arrangements within a bar), but the global tempo track(s) affect the project as a whole.
Polyrhythm support is also poor; although you can think of polyrhythms as of polymeters on a smaller scale, that’s not very practical. There is basic support for tuplets (hotkeys Alt + 1 to Alt + 9):

But you can’t edit tuplet parts individually at the moment, which makes them only useful for drums, probably. Hopefully this will be improved in future.
Metronome
The built-in metronome is toggled by Control + M hotkey.
Each time signature has its own metronome scheme: basically a short sequence of different click sounds, which defines how metronome accents are aligned within one bar:
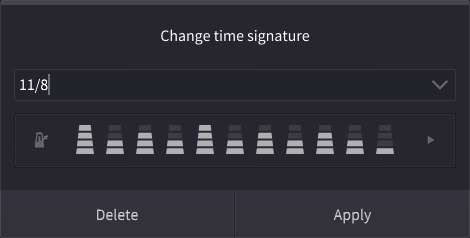
Note that different time signatures with same meter can still have different metronome schemes.
The internal metronome instrument comes with 4 click sounds representing different click accents. You can customize them and pick your own samples in the instrument’s UI:
- either select “Show UI” from the metronome instrument’s menu on the Orchestra Pit page,
- or click on the metronome icon in the time signature dialog (a shortcut to the above).
See also: the default meters config
Tips and tricks
This page lists features, hacks, and nuances that may be handy, non-obvious, or both.
Faster playback
Hitting Space or Enter twice will start playback at 1.5x speed, which can be useful for quickly previewing a sequence, e.g. when prototyping a chord progression.
Alternatively, double-click or middle-click in the roll header while holding any modifier key, or long-tap the play button in the corner.
Warnings
During playback, the sequencer may sometimes draw red or yellow vertical warning lines:
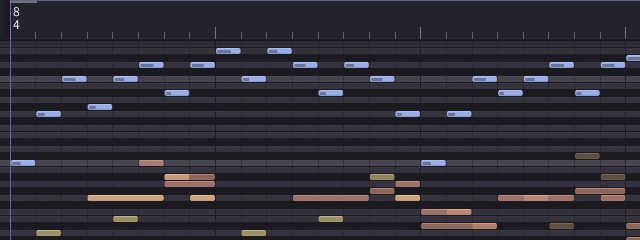
These are the clipping and over-saturation warning markers:
-
red lines indicate problematic regions with clipping sound,
-
yellow warning lines will appear in the areas where the perceived loudness (a.k.a. the root mean square loudness) is way lower than the peak loudness, which is considered
harmfulunhealthy: in my setup it typically means that I have some redundant duplicate notes in the same place.
Spacebar panning
One quick way to switch between the current editing mode and the canvas panning mode is holding the Space key:

Dragging the canvas with the right mouse button does the same thing.
Holding spacebar also works as a hotkey modifier: use Spacebar + Cursor Keys or Spacebar + HJKL to pan the viewport.
Time measure tool
Hold the Space key, then click-and-drag over the timeline to measure time between two points on the timeline:

Sound probe tool
Holding Space and clicking on the timeline is what I call a “sound probe”, and it’s supposed to give you an idea of what notes are playing at any given time:

Range selection
Click-and-drag on the timeline while holding Control or Command to select all notes or clips in a time range:

Freeform selection
Control-dragging in the piano roll or pattern roll allows you to draw a lasso with a freeform shape instead of a usual box. On mobile platforms, long-tap in the selection mode to draw a freeform lasso (in the default mode, long-tap will temporarily switch to box selection).
Resizing a group
Resize a group of notes proportionally by holding Shift:

Drag-and-copy
Hold Shift to drag-and-copy notes in the piano roll, clips in the pattern roll, key/time signatures, annotations or automation events:

Pen tool
Also hold Shift or any modifier key to change the behavior of the pen tool when adding notes. By default, the newly added note is edited in transpose-and-resize mode. Alternatively, there is the drag mode, which is more familiar:

Fine-tuning dynamics
Use the pen tool to hand-draw custom ramps in the volume editor panel. Control how the ramp curve blends with the original velocities by using the mouse wheel:

In the default edit mode, fine-tune volume of the selected notes: dragging them vertically with no modifier keys will shift the velocities linearly, dragging while holding Alt will scale them.
Holding Shift while dragging will shape-shift group’s velocities into a sine (when dragging up) or flatten them, reducing dynamic range (when dragging down):

(the indicator displays the group’s lowest and highest MIDI volume)
You can also adjust notes volume linearly just by middle-button dragging the note components in the piano roll directly.
Note name guides
The G hotkey toggles the note name guides:

Note names depend on the root key of a key signature found at the start of the viewport or selection (see the comment for the temperament model).
Depending on your settings, note names can be displayed in either German or Fixed Do notation (C-D-E or Do-Re-Mi, where Do is always C, Re is always D, and so on).
Mini-maps
The mini-map mode can be toggled with B hotkey, or by clicking at any area except the screen range rectangle.
When in compact mode, the mini-map is stretched to fit all project:

When in full mode, the mini-map allows you to draw a region to zoom in on:

Following playhead
During playback, press the Play or Enter hotkey the second time to focus the viewport on the playhead.
If you enabled following the playhead automatically (“Catch playhead” on the settings page, off by default), use the Cursor Left and Cursor Right hotkeys during playback to adjust how the playhead aligns in the viewport.
Chord tool
By double-clicking on a row in the piano roll you invoke the chord tool:
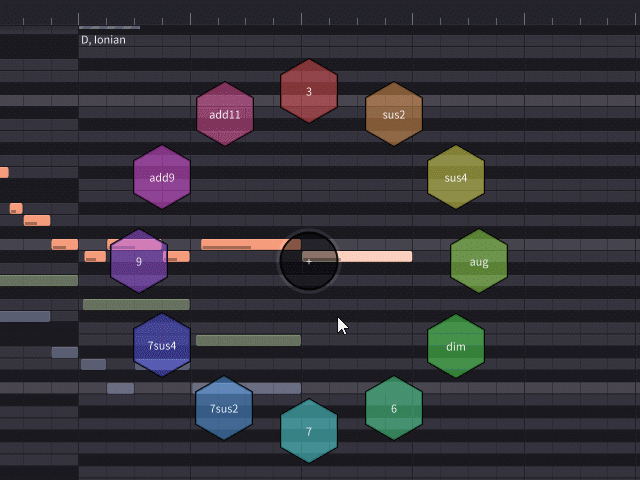
It picks the current key signature from the timeline to determine which scale and root key to use to generate chords. Hence the main limitation of this tool: it can only generate chords that are easy to define with in-scale keys, and it will not generate chords when placed on an out-of-scale key (darker rows).
It can be dragged around by the center node, or controlled via hotkeys:
1,2,3,4,5, etc orPage Up/Page Downto switch to another chord,- cursor keys or
HJKLto move it around, EnterandEscapeto apply or cancel.
Tip: on desktop platforms, you can extend it by adding your own chords.
Knife tool
In my workflow, I’m often adding new tracks with a knife tool: even though there’s a normal way to add an empty track via project menu, or duplicate a track, I often end up having added some sketches in different places of a single sequence, and then seeing that they represent different parts, and can be cut into different tracks after switching to the pattern mode:

Tip: cutting clips while holding any modifier key will immediately rename one of the new tracks to place it on another row.
Merging tracks
The knife tool has an alternative mode: right-click and drag (or long-tap and drag on mobile platforms) to merge one clip with another:
Clips and track grouping
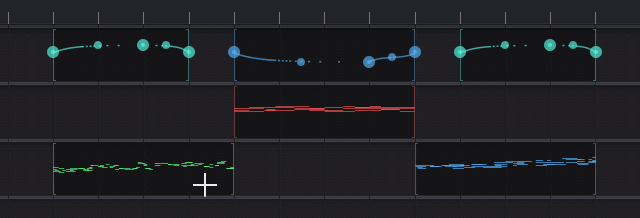
In the example above, two split tracks remain on the same row because the tracks are grouped by name, and the knife tool keeps the track name the same. Pattern roll can also group tracks by color, instrument, or track id.
The segments on one row could be either different tracks or multiple instances (or “clips”) of the same track. Instances always share the same notes, and have the same name and color, but they can be slightly modified: have different position, key shift or volume multiplier, which is mainly meant for prototyping:
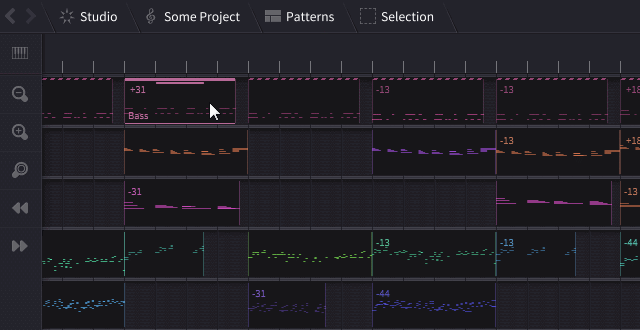
When you select an item in the pattern roll, all of its instances are highlighted with a dashed header: this helps distinguish between “instances” and other tracks with the same name or color on the same row. The F6 hotkey is a quick way to convert an instance to a unique track.
Track grouping also affects MIDI export: all segments on a single row are exported as a single track in the resulting MIDI file.
See also: piano roll hotkeys, pattern roll hotkeys, refactoring options
Refactoring
This page describes various refactoring options, available via selection menus and hotkeys:
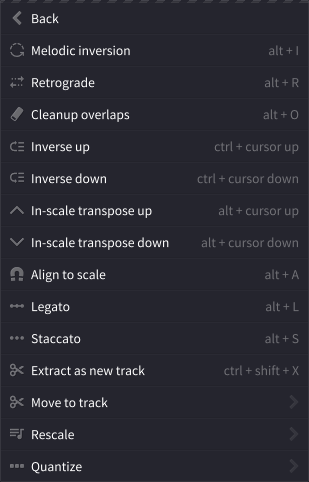
Melodic inversion
The Alt + I hotkey applies melodic inversion to selected notes. This contrapuntal derivation is better described on Wikipedia; in short, it “flips” the melodic line upside down.
Retrograde
The Alt + R hotkey applies another contrapuntal derivation, retrograde or “walking backward”.
Retrograde inversion, which is “backwards and upside down”, can be done by combining inversion and retrograde.
Tip: use the retrograde hotkey to quickly swap two neighbor chords:

Or to swap two notes like this:

The retrograde hotkey also works in the pattern roll, re-ordering all selected clips backwards for each row:

Cleanup overlaps
The Alt + O hotkey removes duplicate notes and corrects lengths in a way that notes do not overlap.
Join adjacent notes
The Alt + J hotkey merges adjacent and overlapping notes.
My typical use case is connecting several neighbour chords:

Transposition and inversion
Not listed in the menu, but also handy: the Shift + Up and Shift + Down hotkeys transpose the selected notes one octave up or down.
Also, Alt + Shift + Up and Alt + Shift + Down are used for transposition by a “fifth” - a transposition by +7 or -7 semitones in the 12-tone temperament, or by the closest equivalent of a perfect fifth in other temperaments, e.g. +18/-18 for 31-edo, etc.
The latter is useful for introducing short-term chord modulations to a “neighboring key” (one step in either direction on the circle of fifths).
The above hotkeys also work for pattern roll selection: creating track “instances” and modulating them may help prototyping the piece’s structure.
Chord inversion
Use the Control + Up and Control + Down hotkeys for chord inversion (don’t confuse it with melodic inversion).
Chord inversion treats selected notes as chord(s); the lowest note in each chord moves one octave up (or the highest note moves one octave down), while all others remain unchanged.
In-scale transposition
Use the Alt + Up and Alt + Down hotkeys to transpose the selected notes using in-scale keys only:
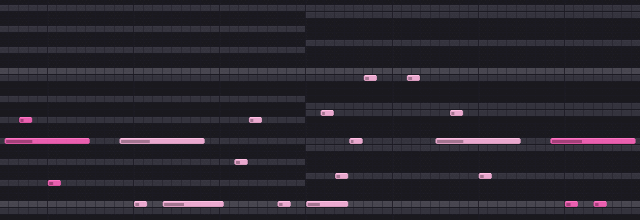
The notes which are out of scale will be aligned up or down to the nearest in-scale keys. You can think of it as “transposition using highlighted rows only”.
Align to scale
Similarly to above, the Alt + A hotkey will snap the selected notes to the nearest highlighted rows.
Staccato and legato
The Alt + S and Alt + L hotkeys apply staccato and legato commands to the selection, respectively. Staccato simply shortens all selected notes (Alt + Shift + S shortens them to their shortest length). Legato connects selected notes together in a way that each note lasts until the next note begins:

Move to track
Pretty self-explanatory shorthand; this function is also available in the command palette: press : and select another track to move the selected notes to. The “closest” tracks will be listed first for convenience.
Rescaling
This re-aligns the selected notes or the entire sequence into one of the parallel modes of the same tonic. You can think of it as introducing the in-place modal interchange.
As well as the chord tool, re-scaling assumes that the harmonic context is specified correctly.
Tip: press the R hotkey to apply re-scaling interactively instead of having to choose the target scale from menus.
Note that this function doesn’t change the key signature. Consider using it for introducing brief or transitory variations to bring more harmonic color. If you want to re-scale an entire section of your piece, use the next option:
Quick rescale tool
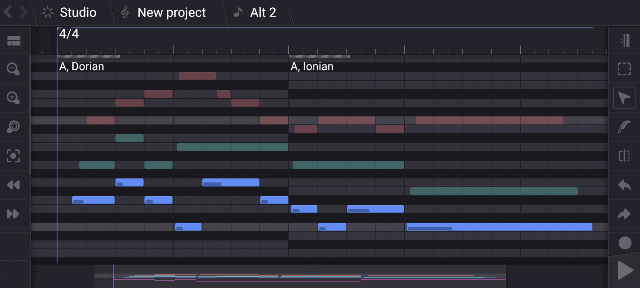
Right-click on any key signature at the timeline to choose another scale into which all tracks will be translated.
This affects all notes in all tracks until the next key signature or the end of the project and updates the key signature. Any out-of-scale notes will be left in their original positions:
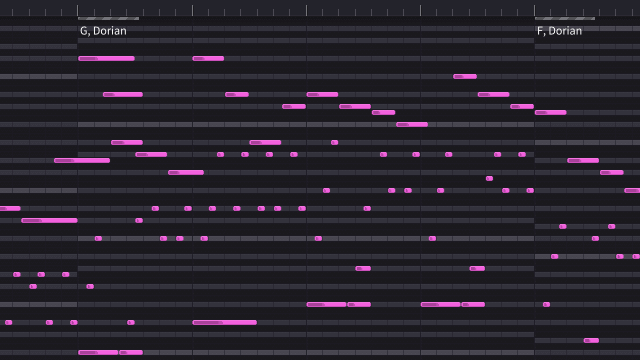
On mobile platforms, long-tap on the key signature:
Arpeggiators
Arpeggiators are available in the notes selection menu. If you have created any arpeggiators, you will also find a button on the right sidebar to apply one of them to a selection.
Alternatively, the A hotkey brings up a menu for testing arpeggiators interactively. Alternatively, you can apply them in a non-destructive way.
How arpeggiators work
The idea behind arpeggiators is to remember any custom sequence of notes in their in-scale keys, so that the sequence is no longer dependent on the scale, and later apply that scale-agnostic sequence to some chords in any different harmonic context.
Arpeggiators also rely on time signatures to remember bar starts. When you apply the arpeggiator, it will try to align to your time context by skipping some of its keys to the nearest bar start if necessary when it hits a bar start on the timeline.
Creating an arpeggiator
Because the creation and use of arpeggiators is tied to harmonic context, arpeggiators rely on valid key signatures at the timeline.
- First, create any sequence in the current key and scale. Any out-of-scale keys will be ignored. Also make sure you haven’t disabled scales highlighting on the setting page to avoid confusion.
- To create a named arpeggiator from that sequence, select it and press the
Shift + Ahotkey or select a submenu item. - After that, in any other place, apply that arpeggiator to any selection, presumably some chords.
Editing arpeggiators
Helio doesn’t provide a separate editor for arpeggiators, but, since each arpeggiator is simply a sequence within a scale, consider the workaround that I ended up using: have a separate project just for arpeggiators and keep them in distinct tracks for convenience, so updating an arpeggiator after editing it is just selecting all events and pressing Shift + A to save it under the same name.
To delete an arpeggiator, manually edit your arpeggiators.json in the documents directory.
Parametric modifiers
Parametric modifiers are another prototyping/sketching tool that allows you to apply effects in a non-destructive way, without affecting the base notes of your sequence.
Add or edit them via the “Modifiers” menu of the selected clip or track. Modifiers can be stacked and reordered there:
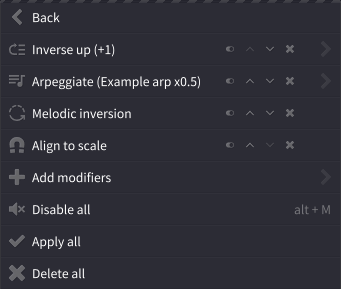
Parametric modifiers are meant for testing arpeggiators and refactoring options, while keeping the underlying chords editable. Keeping the original notes editable lowers the cost of error, especially on the early stages of development. The goal, as with version control, is to reduce friction while experimenting and sketching the piece.
The generated sequence cannot be edited manually and is displayed as dashed semi-transparent notes. When playback starts, the sequencer switches between display modes for the generated and original notes to indicate which notes are being played:
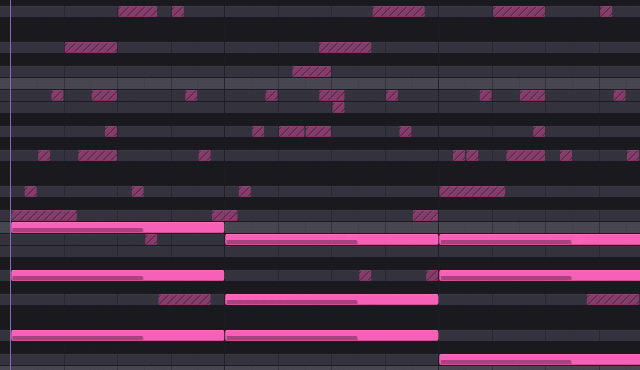
(the main intended use case is prototyping arpeggios for a chord sequence)
A few tips:
- The generated sequences are used in playback and MIDI export.
- Modifiers can be stacked on any individual clip (a.k.a. sequence instance), allowing you to experiment with different effects on the same notes in different places of the project.
- To quickly switch the playback between the generated and original sequences, mute and unmute all modifiers using the
Alt + Mhotkey. - To make all changes permanent and editable, select “Apply all” from the modifiers menu (this basically replaces the original sequence with the generated one and resets the modifiers stack).
Command palette
The command palette control is inspired by ‘Goto Anywhere’ in Sublime Text or ‘Locator’ in QT Creator, and is meant for quick access to the commands available for the current context, and things like projects and timeline events.
Toggled by ~ or Control + P hotkeys by default:
Besides just commands, it supports special modes, triggered by typing a certain symbol. This symbol also acts as a hotkey to show the command palette in that mode:
/is for the project list,:is for moving selected notes into another track (target tracks are ordered “closest first”),@is for the timeline events list + tracks list,!is for the chord compiler:
Chord compiler
One of the modes of that command palette allows to generate chords based on the chord name decoding rules. This tool is not aware of any of the key signatures present at the timeline, all the chord’s notes are inferred from the given description.
Hit ! and start typing a chord description, or pick some of the suggestions it provides:
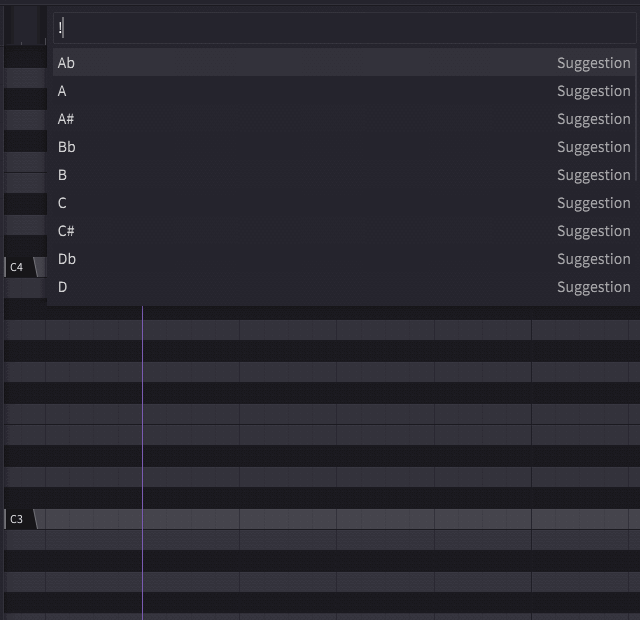
Configs
Helio has several built-in configuration files for scales, temperaments, in-scale chords, meters, hotkeys, and colour schemes.
You can extend them by creating any of these files in your projects directory:
meters.jsonchords.jsonscales.jsontemperaments.jsoncolourSchemes.json
This page lists built-in defaults and examples of how to extend them:
Built-in chords
This config lists all chords displayed in the chord tool:
{
  /*
    A number of chords that are easy to define with in-scale keys.
    Sharp or flat near the number simply works as one step up/down.
  */
  "chords": {
    "chord": [
      { "name": "3", "keys": "1 3 5" },
      { "name": "sus2", "keys": "1 2 5" },
      { "name": "sus4", "keys": "1 4 5" },
      { "name": "6", "keys": "1 3 5 6" },
      { "name": "7", "keys": "1 3 5 7" },
      { "name": "7 sus2", "keys": "1 2 5 7" },
      { "name": "7 sus4", "keys": "1 4 5 7" },
      { "name": "9", "keys": "1 3 5 7 9" },
      { "name": "add9", "keys": "1 3 5 9" },
      // { "name": "add9 sus4", "keys": "1 4 5 9" },
      // { "name": "add11", "keys": "1 3 5 11" },
      { "name": "aug", "keys": "1 3 5#" },
      { "name": "dim", "keys": "1 3 5b" }
    ]
  }
}
Built-in temperaments
Temperaments define how highlighting works in the piano roll, including octave size and key names, and which scales are available to choose from. Temperament description also provides a chromatic approximation, which is used when converting a piece from one temperament to another:
{
  "temperaments": {
    "temperament": [
      {
        "id": "12edo",
        "name": "12 equal temperament",
        "period": "C/B# C#/Db D Eb/D# E/Fb F/E# F#/Gb G G#/Ab A Bb/A# B/Cb",
        "highlighting": "2 2 1 2 2 2 1",
        "chromaticMap": "1 1 1 1 1 1 1 1 1 1 1 1",
        "chromaticScale": [
          { "key": "A", "scale": "A A# B C C# D D# E F F# G G#" },
          { "key": "Ab", "scale": "Ab A Bb B C Db D Eb E F Gb G" },
          { "key": "A#", "scale": "A# B C C# D D# E F F# G G# A" },
          { "key": "B", "scale": "B C C# D D# E F F# G G# A A#" },
          { "key": "Bb", "scale": "Bb B C Db D Eb E F Gb G Ab A" },
          { "key": "B#", "scale": "B# C# D D# E F F# G G# A A# B" },
          { "key": "C", "scale": "C C# D D# E F F# G G# A A# B" },
          { "key": "Cb", "scale": "Cb C Db D Eb E F Gb G Ab A Bb" },
          { "key": "C#", "scale": "C# D D# E F F# G G# A A# B C" },
          { "key": "D", "scale": "D D# E F F# G G# A A# B C C#" },
          { "key": "Db", "scale": "Db D Eb E F Gb G Ab A Bb B C" },
          { "key": "D#", "scale": "D# E F F# G G# A A# B C C# D" },
          { "key": "E", "scale": "E F F# G G# A A# B C C# D D#" },
          { "key": "Eb", "scale": "Eb E F Gb G Ab A Bb B C Db D" },
          { "key": "E#", "scale": "E# F# G G# A A# B C C# D D# E" },
          { "key": "F", "scale": "F Gb G Ab A Bb B C Db D Eb E" },
          { "key": "Fb", "scale": "Fb F Gb G Ab A Bb B C Db D Eb" },
          { "key": "F#", "scale": "F# G G# A A# B C C# D D# E F" },
          { "key": "G", "scale": "G G# A A# B C C# D D# E F F#" },
          { "key": "Gb", "scale": "Gb G Ab A Bb B C Db D Eb E F" },
          { "key": "G#", "scale": "G# A A# B C C# D D# E F F# G" }
        ]
      },
      {
        "id": "19edo",
        "name": "19 equal temperament",
        "period": "C C# Cx D D# Eb E E# F F# Fx G G# Ab A A# Bb B B#",
        "highlighting": "2 1 2 1 2 2 1 2 1 2 2 1",
        "chromaticMap": "2 1 2 1 2 2 1 2 1 2 2 1"
      },
      {
        "id": "22edo",
        "name": "22 equal temperament",
        "period": "C ^C vC# C# D Eb ^Eb vE E F Gb ^Gb vG G Ab ^Ab vA A Bb ^Bb vB B",
        "highlighting": "3 1 3 1 3 1 1 3 1 3 1 1",
        "chromaticMap": "3 1 3 1 3 1 1 3 1 3 1 1"
      },
      {
        "id": "26edo",
        "name": "26 equal temperament",
        "period": "D D# Ebb Eb E E# Fb F F# Fx Gb G G# Gx Ab A A# Bbb Bb B B# Cb C C# Cx Db",
        "highlighting": "2 2 3 1 3 2 2 2 2 3 2 2",
        "chromaticMap": "2 2 3 1 3 2 2 2 2 3 2 2"
      },
      {
        "id": "31edo",
        "name": "31 equal temperament",
        "period": "C Dbb C# Db C## D Ebb D# Eb D## E Fb E# F Gbb F# Gb F## G Abb G# Ab G## A Bbb A# Bb A## B Cb B#",
        "highlighting": "2 3 3 2 3 2 3 2 3 3 2 3",
        "chromaticMap": "2 3 3 2 3 2 3 2 3 3 2 3"
      }
    ]
  }
}
Temperaments allow to specify up to 3 enharmonic equivalents per key, and custom chromatic scale note namings for each enharmonic equivalent. This is to make note names more consistent with traditional notation language, although not ideal, because it only uses names from chromatic scales; in the context of diatonic scales, note names will still differ from traditional notation because the sequencer displays both the chromatic scale (the grid itself) and whatever scales within it (the highlighted rows) at the same time.
Built-in scales
Scales listed here are available to choose from in the key signature dialog, and in the rescale tool. Scales with octave size mismatching the current temperament’s octave size are ignored.
{
  "scales": {
    "scale": [

      // 12 edo scales; source: "The Scale Omnibus"
      { "period": 12, "name": "Ionian", "intervals": "2 2 1 2 2 2 1" },
      { "period": 12, "name": "Aeolian", "intervals": "2 1 2 2 1 2 2" },
      { "period": 12, "name": "Lydian", "intervals": "2 2 2 1 2 2 1" },
      { "period": 12, "name": "Mixolydian", "intervals": "2 2 1 2 2 1 2" },
      { "period": 12, "name": "Dorian", "intervals": "2 1 2 2 2 1 2" },
      { "period": 12, "name": "Phrygian", "intervals": "1 2 2 2 1 2 2" },
      { "period": 12, "name": "Locrian", "intervals": "1 2 2 1 2 2 2" },
      { "period": 12, "name": "Melodic Major", "intervals": "2 2 1 2 1 2 2" },
      { "period": 12, "name": "Melodic Minor", "intervals": "2 1 2 2 2 2 1" },
      { "period": 12, "name": "Harmonic Major", "intervals": "2 2 1 2 1 3 1" },
      { "period": 12, "name": "Harmonic Minor", "intervals": "2 1 2 2 1 3 1" },
      { "period": 12, "name": "Hungarian Major", "intervals": "3 1 2 1 2 1 2" },
      { "period": 12, "name": "Hungarian Minor", "intervals": "2 1 1 3 1 3 1" },
      { "period": 12, "name": "Neapolitan Major", "intervals": "1 2 2 2 2 2 1" },
      { "period": 12, "name": "Neapolitan Minor", "intervals": "1 2 2 2 1 3 1" },
      { "period": 12, "name": "Romanian Major", "intervals": "1 3 2 1 2 1 2" },
      { "period": 12, "name": "Romanian Minor", "intervals": "2 1 3 1 2 1 2" },
      { "period": 12, "name": "Enigmatic", "intervals": "1 3 2 2 2 1 1" },
      { "period": 12, "name": "Enigmatic Minor", "intervals": "1 2 3 2 2 1 1" },
      { "period": 12, "name": "Ionian Augmented", "intervals": "2 2 1 3 1 2 1" },
      { "period": 12, "name": "Lydian Augmented", "intervals": "2 2 2 2 1 2 1" },
      { "period": 12, "name": "Lydian Diminished", "intervals": "2 1 3 1 2 2 1" },
      { "period": 12, "name": "Lydian Dominant", "intervals": "2 2 2 1 2 1 2" },
      { "period": 12, "name": "Mixolydian Augmented", "intervals": "2 2 1 3 1 1 2" },
      { "period": 12, "name": "Phrygian Dominant", "intervals": "1 3 1 2 1 2 2" },
      { "period": 12, "name": "Ultraphrygian", "intervals": "1 2 1 3 1 1 3" },
      { "period": 12, "name": "Locrian Dominant", "intervals": "1 3 1 1 2 2 2" },
      { "period": 12, "name": "Superlocrian", "intervals": "1 2 1 2 2 2 2" },
      { "period": 12, "name": "Ultralocrian", "intervals": "1 2 1 2 2 1 3" },
      { "period": 12, "name": "Major Locrian", "intervals": "2 2 1 1 2 2 2" },
      { "period": 12, "name": "Half Diminished", "intervals": "2 1 2 1 2 2 2" },
      { "period": 12, "name": "Leading Whole-Tone", "intervals": "2 2 2 2 2 1 1" },
      { "period": 12, "name": "Double Harmonic", "intervals": "1 3 1 2 1 3 1" },
      { "period": 12, "name": "Blues Heptatonic", "intervals": "2 1 2 1 3 1 2" },
      { "period": 12, "name": "Blues Phrygian", "intervals": "1 2 2 1 1 3 2" },
      { "period": 12, "name": "Blues Modified", "intervals": "2 1 2 1 1 3 2" },
      { "period": 12, "name": "Blues Mixed", "intervals": "3 1 1 1 1 3 2" },
      { "period": 12, "name": "Blues Leading Tone", "intervals": "3 2 1 1 3 1 1" },
      { "period": 12, "name": "Rock'n'Roll", "intervals": "3 1 1 2 2 1 2" },

      // 19 edo scales; source: https://xen.wiki/w/19edo_modes
      { "period": 19, "name": "Ionian", "intervals": "3 3 2 3 3 3 2" },
      { "period": 19, "name": "Aeolian", "intervals": "3 2 3 3 2 3 3" },
      { "period": 19, "name": "Lydian", "intervals": "3 3 3 2 3 3 2" },
      { "period": 19, "name": "Mixolydian", "intervals": "3 3 2 3 3 2 3" },
      { "period": 19, "name": "Dorian", "intervals": "3 2 3 3 3 2 3" },
      { "period": 19, "name": "Phrygian", "intervals": "2 3 3 3 2 3 3"},
      { "period": 19, "name": "Locrian", "intervals": "2 3 3 2 3 3 3" },
      { "period": 19, "name": "Major Locrian", "intervals": "2 2 3 3 3 3 3" },
      { "period": 19, "name": "Melodic Minor", "intervals": "2 3 2 3 3 3 3" },
      { "period": 19, "name": "Harmonic Minor", "intervals": "2 3 2 3 3 2 4" },
      { "period": 19, "name": "Harmonic Major", "intervals": "2 3 2 4 2 3 3" },
      { "period": 19, "name": "Deutone 0|6", "intervals": "1 3 3 3 3 3 3" },
      { "period": 19, "name": "Deutone 1|5", "intervals": "3 1 3 3 3 3 3" },
      { "period": 19, "name": "Deutone 2|4", "intervals": "3 3 1 3 3 3 3" },
      { "period": 19, "name": "Deutone 3|3", "intervals": "3 3 3 1 3 3 3" },
      { "period": 19, "name": "Deutone 4|2", "intervals": "3 3 3 3 1 3 3" },
      { "period": 19, "name": "Deutone 5|1", "intervals": "3 3 3 3 3 1 3" },
      { "period": 19, "name": "Deutone 6|0", "intervals": "3 3 3 3 3 3 1" },
      { "period": 19, "name": "Kleismic 0|6", "intervals": "1 4 1 4 1 4 4" },
      { "period": 19, "name": "Kleismic 1|5", "intervals": "1 4 1 4 4 1 4" },
      { "period": 19, "name": "Kleismic 2|4", "intervals": "1 4 4 1 4 1 4" },
      { "period": 19, "name": "Kleismic 3|3", "intervals": "4 1 4 1 4 1 4" },
      { "period": 19, "name": "Kleismic 4|2", "intervals": "4 1 4 1 4 4 1" },
      { "period": 19, "name": "Kleismic 5|1", "intervals": "4 1 4 4 1 4 1" },
      { "period": 19, "name": "Kleismic 6|0", "intervals": "4 4 1 4 1 4 1" },
      { "period": 19, "name": "Magic 0|6", "intervals": "1 1 5 1 5 1 5" },
      { "period": 19, "name": "Magic 1|5", "intervals": "1 5 1 1 5 1 5" },
      { "period": 19, "name": "Magic 2|4", "intervals": "1 5 1 5 1 1 5" },
      { "period": 19, "name": "Magic 3|3", "intervals": "1 5 1 5 1 5 1" },
      { "period": 19, "name": "Magic 4|2", "intervals": "5 1 1 5 1 5 1" },
      { "period": 19, "name": "Magic 5|1", "intervals": "5 1 5 1 1 5 1" },
      { "period": 19, "name": "Magic 6|0", "intervals": "5 1 5 1 5 1 1" },

      // 22 edo scales; source: https://xen.wiki/w/22edo
      { "period": 22, "name": "Harmonic Minor", "intervals": "4 2 3 4 2 5 2" },
      { "period": 22, "name": "Just Major", "intervals": "4 3 2 4 3 4 2" },
      { "period": 22, "name": "Natural Minor", "intervals": "4 2 3 4 2 4 3" },
      { "period": 22, "name": "Tetrachordal Major", "intervals": "4 3 2 4 4 3 2" },
      { "period": 22, "name": "Tetrachordal Minor", "intervals": "4 2 3 4 2 3 4" },
      { "period": 22, "name": "Just Harmonic Minor", "intervals": "4 2 3 4 2 5 2" },
      { "period": 22, "name": "Just Harmonic Major", "intervals": "4 3 2 4 2 5 2" },
      { "period": 22, "name": "Just Melodic Minor", "intervals": "4 2 3 4 3 4 2" },
      { "period": 22, "name": "Superpyth Harmonic Minor", "intervals": "4 1 4 4 1 7 1" },
      { "period": 22, "name": "Superpyth Harmonic Major", "intervals": "4 4 1 4 1 7 1" },
      { "period": 22, "name": "Superpyth Melodic Minor", "intervals": "4 1 4 4 4 4 1" },
      { "period": 22, "name": "Superpyth Diatonic", "intervals": "4 1 4 4 4 1 4" },
      { "period": 22, "name": "Superpyth Double Harmonic", "intervals": "1 7 1 4 1 7 1" },
      { "period": 22, "name": "Porcupine Bright Major", "intervals": "4 3 3 3 3 4 2" },
      { "period": 22, "name": "Porcupine Bright Minor", "intervals": "4 2 4 3 3 3 3" },
      { "period": 22, "name": "Porcupine Dark Minor", "intervals": "4 2 3 4 3 3 3" },

      // 26 edo scales; home-cooked approximations of 12-edo
      { "period": 26, "name": "Ionian", "intervals": "4 5 2 4 5 4 2" },
      { "period": 26, "name": "Aeolian", "intervals": "4 3 4 4 2 5 4" },
      { "period": 26, "name": "Lydian", "intervals": "4 5 4 2 5 4 2" },
      { "period": 26, "name": "Mixolydian", "intervals": "4 5 2 4 5 2 4" },
      { "period": 26, "name": "Dorian", "intervals": "4 3 4 4 5 2 4" },
      { "period": 26, "name": "Phrygian", "intervals": "2 5 4 4 2 5 4" },
      { "period": 26, "name": "Locrian", "intervals": "2 5 4 2 4 5 4" },
      { "period": 26, "name": "Melodic Major", "intervals": "4 5 2 4 2 5 4" },
      { "period": 26, "name": "Melodic Minor", "intervals": "4 3 4 4 5 4 2" },
      { "period": 26, "name": "Harmonic Major", "intervals": "4 5 2 4 2 7 2" },
      { "period": 26, "name": "Harmonic Minor", "intervals": "4 3 4 4 2 7 2" },
      { "period": 26, "name": "Neapolitan Major", "intervals": "2 5 4 4 5 4 2" },
      { "period": 26, "name": "Neapolitan Minor", "intervals": "2 5 4 4 2 7 2" },
      { "period": 26, "name": "Romanian Major", "intervals": "2 7 4 2 5 2 4" },
      { "period": 26, "name": "Romanian Minor", "intervals": "4 3 6 2 5 2 4" },

      // 31 edo scales; source: https://xen.wiki/w/31edo_modes
      { "period": 31, "name": "Ionian", "intervals": "5 5 3 5 5 5 3" },
      { "period": 31, "name": "Aeolian", "intervals": "5 3 5 5 3 5 5" },
      { "period": 31, "name": "Major-Minor", "intervals": "5 5 3 5 3 5 5" },
      { "period": 31, "name": "Melodic Minor", "intervals": "5 3 5 5 5 5 3" },
      { "period": 31, "name": "Harmonic Major", "intervals": "5 5 3 5 3 7 3" },
      { "period": 31, "name": "Harmonic Minor", "intervals": "5 3 5 5 3 7 3" },
      { "period": 31, "name": "Intense Diatonic Mixolydian", "intervals": "3 5 5 3 5 5 5" },
      { "period": 31, "name": "Intense Diatonic Phrygian", "intervals": "5 3 5 5 5 3 5" },
      { "period": 31, "name": "Intense Diatonic Dorian", "intervals": "3 5 5 5 3 5 5" },
      { "period": 31, "name": "Intense Diatonic Hypolydian", "intervals": "5 5 5 3 5 5 3" },
      { "period": 31, "name": "Intense Diatonic Hypophrygian", "intervals": "5 5 3 5 5 3 5" },
      { "period": 31, "name": "Neutral Diatonic Mixolydian", "intervals": "4 4 5 4 4 5 5" },
      { "period": 31, "name": "Neutral Diatonic Lydian", "intervals": "4 5 4 4 5 5 4" },
      { "period": 31, "name": "Neutral Diatonic Phrygian", "intervals": "5 4 4 5 5 4 4" },
      { "period": 31, "name": "Neutral Diatonic Dorian", "intervals": "4 4 5 5 4 4 5" },
      { "period": 31, "name": "Neutral Diatonic Hypolydian", "intervals": "4 5 5 4 4 5 4" },
      { "period": 31, "name": "Neutral Diatonic Hypophrygian", "intervals": "5 5 4 4 5 4 4" },
      { "period": 31, "name": "Neutral Diatonic Hypodorian", "intervals": "5 4 4 5 4 4 5" },
      { "period": 31, "name": "Soft Diatonic Mixolydian", "intervals": "2 5 6 2 5 6 5" },
      { "period": 31, "name": "Soft Diatonic Lydian", "intervals": "5 6 2 5 6 5 2" },
      { "period": 31, "name": "Soft Diatonic Phrygian", "intervals": "6 2 5 6 5 2 5" },
      { "period": 31, "name": "Soft Diatonic Dorian", "intervals": "2 5 6 5 2 5 6" },
      { "period": 31, "name": "Soft Diatonic Hypolydian", "intervals": "5 6 5 2 5 6 2" },
      { "period": 31, "name": "Soft Diatonic Hypophrygian", "intervals": "6 5 2 5 6 2 5" },
      { "period": 31, "name": "Soft Diatonic Hypodorian", "intervals": "5 2 5 6 2 5 6" },
      { "period": 31, "name": "Hemiolic Chromatic Mixolydian", "intervals": "2 2 9 2 2 9 5" },
      { "period": 31, "name": "Hemiolic Chromatic Lydian", "intervals": "2 9 2 2 9 5 2" },
      { "period": 31, "name": "Hemiolic Chromatic Phrygian", "intervals": "9 2 2 9 5 2 2" },
      { "period": 31, "name": "Hemiolic Chromatic Dorian", "intervals": "2 2 9 5 2 2 9" },
      { "period": 31, "name": "Hemiolic Chromatic Hypolydian", "intervals": "2 9 5 2 2 9 2" },
      { "period": 31, "name": "Hemiolic Chromatic Hypophrygian", "intervals": "9 5 2 2 9 2 2" },
      { "period": 31, "name": "Hemiolic Chromatic Hypodorian", "intervals": "5 2 2 9 2 2 9" },
      { "period": 31, "name": "Ratio 2:3 Chromatic Mixolydian", "intervals": "2 3 8 2 3 8 5" },
      { "period": 31, "name": "Ratio 2:3 Chromatic Lydian", "intervals": "3 8 2 3 8 5 2" },
      { "period": 31, "name": "Ratio 2:3 Chromatic Phrygian", "intervals": "8 2 3 8 5 2 3" },
      { "period": 31, "name": "Ratio 2:3 Chromatic Dorian", "intervals": "2 3 8 5 2 3 8" },
      { "period": 31, "name": "Ratio 2:3 Chromatic Hypolydian", "intervals": "3 8 5 2 3 8 2" },
      { "period": 31, "name": "Ratio 2:3 Chromatic Hypophrygian", "intervals": "8 5 2 3 8 2 3" },
      { "period": 31, "name": "Ratio 2:3 Chromatic Hypodorian", "intervals": "5 2 3 8 2 3 8" },
      { "period": 31, "name": "Enharmonic Dorian", "intervals": "1 2 10 5 1 2 10" },
      { "period": 31, "name": "Enharmonic Hypodorian", "intervals": "5 1 2 10 1 2 10" },
      { "period": 31, "name": "Enharmonic Hypolydian", "intervals": "2 10 5 1 2 10 1" },
      { "period": 31, "name": "Enharmonic Hypophrygian", "intervals": "10 5 1 2 10 1 2" },
      { "period": 31, "name": "Enharmonic Lydian", "intervals": "2 10 1 2 10 5 1" },
      { "period": 31, "name": "Enharmonic Mixolydian", "intervals": "1 2 10 1 2 10 5" },
      { "period": 31, "name": "Enharmonic Phrygian", "intervals": "10 1 2 10 5 1 2" },
      { "period": 31, "name": "Altered Dorian", "intervals": "5 3 5 5 5 4 4" },
      { "period": 31, "name": "Altered Neapolitan Major", "intervals": "3 5 5 5 5 4 4" },
      { "period": 31, "name": "Hyperblue Dorian", "intervals": "8 5 2 3 6 2 5" },
      { "period": 31, "name": "Hyperblue Harmonic", "intervals": "8 5 2 3 2 9 2" },
      { "period": 31, "name": "Phrygian Harmonic", "intervals": "2 8 3 5 2 5 6" },
      { "period": 31, "name": "Septimal Natural Minor", "intervals": "5 2 6 5 2 5 6" },
      { "period": 31, "name": "Subminor Altered", "intervals": "2 5 3 5 5 5 6" },
      { "period": 31, "name": "Tropical Major", "intervals": "5 7 1 5 7 5 1" },
      { "period": 31, "name": "Turkish Major", "intervals": "5 5 3 5 4 5 4" }
    ]
  }
}
Built-in meters
Meters listed here are available to choose from in the time signature dialog.
Each meter comes with a metronome, which is described using “Oona Pana” scheme, suggested by Rods Bobavich - a simplified, but handy way to describe musical rhythms, which is also easy to read and edit manually.
Metronome schemes listed here are just the default ones, and they can be edited for each time signature separately in the time signature dialog.
{
  "meters": {
    "meter": [
      {
        "name": "Common time",
        "time": "4/4",
        "metronome": "oona pana"
      },
      {
        "name": "Alla breve",
        "time": "2/4",
        "metronome": "oona"
      },
      {
        "name": "Waltz time",
        "time": "3/4",
        "metronome": "oonapa"
      },
      {
        "time": "5/4",
        "metronome": "oonapa pana"
      },
      {
        "time": "6/4",
        "metronome": "oonapa panapa"
      },
      {
        "time": "7/8",
        "metronome": "oonapa pana papa"
      },
      {
        "time": "9/8",
        "metronome": "oonapa panapa panapa"
      },
      {
        "time": "10/8",
        "metronome": "oona panapa pana panapa"
      },
      {
        "time": "11/8",
        "metronome": "oona papa oona pana panapa"
      },
      {
        "time": "13/8",
        "metronome": "oonapa panapa panapa pana papa"
      }
    ]
  }
}
Custom scales
The minimal content for scales.json is as follows:
{
  "scales": {
    "scale": [
      { "period": 12, "name": "Oriental", "intervals": "1 3 1 1 3 1 2" }
    ]
  }
}
What it means:
"period": 12- this scale will be available only in twelve-tone projects,"name": "Oriental"- scales are merged by name; if the built-in list contained a scale with such name, it would be replaced,"intervals": "1 3 1 1 3 1 2"- successive intervals, in dieses (this one is a heptatonic scale, i.e. it contains 7 intervals).
Here’s the example config with additional strictly proper scales for 31-edo:
{
  "scales": {
    "scale": [
      { "name": "Breed, Hemisub", "period": 31, "intervals": "3 4 5 6 2 6 5" },
      { "name": "Breed, Inverse Hemisub", "period": 31, "intervals": "4 3 5 6 2 6 5" },
      { "name": "Breed, Heminewt", "period": 31, "intervals": "6 3 5 4 5 3 5" },
      { "name": "Breed, Inverse Heminewt", "period": 31, "intervals": "4 5 3 6 5 3 5" },

      { "name": "Orwell, Orminor", "period": 31, "intervals": "5 3 6 4 4 6 3" },
      { "name": "Orwell, Ormed", "period": 31, "intervals": "4 6 4 4 6 4 3" },
      { "name": "Orwell, Augton", "period": 31, "intervals": "4 6 4 4 3 6 4" },
      { "name": "Orwell, Inverse Augton", "period": 31, "intervals": "4 6 4 4 6 3 4" },

      { "name": "Mothra, Lydic", "period": 31, "intervals": "5 5 5 3 6 4 3" },
      { "name": "Mothra, Inverse Lydic", "period": 31, "intervals": "5 5 5 3 4 6 3" },
      { "name": "Mothra, Ionic", "period": 31, "intervals": "5 5 3 5 4 6 3" },
      { "name": "Mothra, Inverse Ionic", "period": 31, "intervals": "5 3 6 4 5 3 5" },
      { "name": "Mothra, Quahog", "period": 31, "intervals": "4 6 4 4 4 6 3" },
      { "name": "Mothra, Inverse Quahog", "period": 31, "intervals": "6 4 4 4 6 4 3" },
      { "name": "Mothra, Higasi", "period": 31, "intervals": "6 4 5 3 6 4 3" },
      { "name": "Mothra, Inverse Higasi", "period": 31, "intervals": "4 6 3 5 4 6 3" },

      { "name": "Hemiwuerschmidt, Hemithirds", "period": 31, "intervals": "5 5 5 5 5 1 5" },
      { "name": "Hemiwuerschmidt, Hemaj", "period": 31, "intervals": "5 5 4 4 6 5 2" },
      { "name": "Hemiwuerschmidt, Hemin", "period": 31, "intervals": "4 4 5 5 2 5 6" },
      { "name": "Hemiwuerschmidt, Gypsi", "period": 31, "intervals": "4 5 2 5 5 4 6" },
      { "name": "Hemiwuerschmidt, Inverse Gypsi", "period": 31, "intervals": "4 5 5 2 5 4 6" },
      { "name": "Hemiwuerschmidt, Leadhole", "period": 31, "intervals": "5 5 5 5 5 4 2" },
      { "name": "Hemiwuerschmidt, Inverse Leadhole", "period": 31, "intervals": "5 5 5 5 5 2 4" },

      { "name": "Mohajira, Sikah", "period": 31, "intervals": "4 5 5 4 4 5 4" },
      { "name": "Mohajira, Sheimanic", "period": 31, "intervals": "4 4 4 4 5 5 5" },
      { "name": "Mohajira, Thaiic", "period": 31, "intervals": "4 5 5 4 4 4 5" },
      { "name": "Mohajira, Inverse Thaiic", "period": 31, "intervals": "4 5 4 4 4 5 5" },
      { "name": "Mohajira, Neutral Dorian", "period": 31, "intervals": "4 5 4 5 4 5 4" },

      { "name": "Miracle, Subdom", "period": 31, "intervals": "5 4 3 6 3 4 6" },
      { "name": "Miracle, Superton", "period": 31, "intervals": "5 6 4 3 6 3 4" },
      { "name": "Miracle, Nudia", "period": 31, "intervals": "5 4 3 6 3 6 4" },
      { "name": "Miracle, Inverse Nudia", "period": 31, "intervals": "5 4 6 3 6 3 4" },
      { "name": "Miracle, Nurow", "period": 31, "intervals": "3 6 3 6 3 4 6" },
      { "name": "Miracle, Inverse Nurow", "period": 31, "intervals": "6 3 6 3 6 4 3" },

      { "name": "Valentine, Silver", "period": 31, "intervals": "6 4 4 6 2 7 2" },
      { "name": "Valentine, Harmonia", "period": 31, "intervals": "6 4 4 4 4 7 2" },
      { "name": "Valentine, Inverse Harmonia", "period": 31, "intervals": "4 4 4 6 2 7 4" },
      { "name": "Valentine, Pendragon", "period": 31, "intervals": "6 4 4 4 5 6 2" },
      { "name": "Valentine, Inverse Pendragon", "period": 31, "intervals": "4 6 2 6 5 4 4" },
      { "name": "Valentine, Hipop", "period": 31, "intervals": "6 2 6 4 4 6 3" },
      { "name": "Valentine, Inverse Hipop", "period": 31, "intervals": "4 6 2 6 3 6 4" },
      { "name": "Valentine, Malakon", "period": 31, "intervals": "4 6 2 6 4 4 5" },
      { "name": "Valentine, Inverse Malakon", "period": 31, "intervals": "4 6 2 6 4 5 4" },
      { "name": "Valentine, Bagpipe", "period": 31, "intervals": "4 4 6 4 5 2 6" },
      { "name": "Valentine, Inverse Bagpipe", "period": 31, "intervals": "4 6 4 4 6 2 5" },
      { "name": "Valentine, Pitu", "period": 31, "intervals": "6 4 4 4 6 2 5" },
      { "name": "Valentine, Inverse Pitu", "period": 31, "intervals": "6 4 4 4 6 5 2" },
      { "name": "Valentine, Porch", "period": 31, "intervals": "6 4 4 4 4 4 5" },
      { "name": "Valentine, Inverse Porch", "period": 31, "intervals": "4 4 4 6 5 4 4" },

      { "name": "Meantone, Diatonic", "period": 31, "intervals": "5 5 3 5 5 5 3" },
      { "name": "Meantone, Melodic Minor", "period": 31, "intervals": "5 3 5 5 5 5 3" },
      { "name": "Meantone, Harmonic Minor", "period": 31, "intervals": "5 3 5 5 3 7 3" },
      { "name": "Meantone, Harmonic Major", "period": 31, "intervals": "5 5 3 5 3 7 3" },
      { "name": "Meantone, Major Locrian", "period": 31, "intervals": "5 5 3 3 5 5 5" },
      { "name": "Meantone, Diminished Diatonic", "period": 31, "intervals": "3 7 1 7 3 5 5" },
      { "name": "Meantone, Enharmonic Major", "period": 31, "intervals": "5 5 3 5 6 4 3" },
      { "name": "Meantone, Enharmonic Minor", "period": 31, "intervals": "5 3 4 6 5 3 5" },
      { "name": "Meantone, Enharmonic Mixolydian", "period": 31, "intervals": "5 5 3 5 6 2 5" },
      { "name": "Meantone, Inverse Enharmonic Mixolydian", "period": 31, "intervals": "5 5 2 6 5 3 5" },
      { "name": "Meantone, Enharmonic Major-Minor", "period": 31, "intervals": "5 5 2 6 3 5 5" },
      { "name": "Meantone, Inverse Enharmonic Major-Minor", "period": 31, "intervals": "5 5 5 3 6 2 5" },
      { "name": "Meantone, Major Doubleflat", "period": 31, "intervals": "6 4 3 5 6 2 5" },
      { "name": "Meantone, Minor Doubleflat", "period": 31, "intervals": "5 3 4 6 5 2 6" },
      { "name": "Meantone, Ping", "period": 31, "intervals": "5 5 5 3 6 5 2" },
      { "name": "Meantone, Inverse Ping", "period": 31, "intervals": "3 5 5 5 2 5 6" },
      { "name": "Meantone, Alhijaz", "period": 31, "intervals": "3 7 2 6 3 5 5" },
      { "name": "Meantone, Ambika", "period": 31, "intervals": "6 2 7 3 5 5 3" },
      { "name": "Meantone, Kung", "period": 31, "intervals": "6 4 5 3 6 5 2" },
      { "name": "Meantone, Ousak", "period": 31, "intervals": "3 5 4 6 2 5 6" }
    ]
  }
}
Custom temperaments
To add a temperament, create temperaments.json; for example, let’s add 24-EDO:
{
  "temperaments": {
    "temperament": [
      {
        "id": "24edo",
        "name": "24 equal temperament",
        "period": "C ^C C# vD D ^D Eb vE E ^E F ^F F# vG G ^G Ab vA A ^A Bb vB B ^B",
		"periodRange": 2.0,
        "highlighting": "3 4 3 4 3 4 3",
        "chromaticMap": "2 2 2 2 2 2 2 2 2 2 2 2"
      }
    ]
  }
}
What it means:
id- if the built-in list contained a temperament with such id, it would be replaced,name- this is displayed in the menus,period- key names separated by whitespace; the number of keys defines the octave size,periodRange- the pitch range that makes up a period, defaults 2.0 representing one octave; for nonoctave tunings use 3.0 for the duodecime used in the Bohlen-Pierce tuning or 1.5 for the pure fifth, used in the Carlos Alpha, Beta and Gamma tunings; for backward compatibility, if this parameter isn’t given, Helio assumes one octave; this parameter only affects the built-in instrument at the moment,highlighting- the default highlighting scheme in the piano roll, i.e. which rows are highlighted as “white keys” by default,chromaticMap- this is used to convert temperaments; here, since 24-EDO just divides the 12-tone semitone in two, the chromatic map just jumps over quarter-tones.
You might want to add some scales for it, for example:
{
  "scales": {
    "scale": [
      // append this list to your scales:
      { "period": 24, "name": "Maqam Nahfat", "intervals": "3 3 4 4 4 2 4" },
      { "period": 24, "name": "Maqam Saba", "intervals": "3 3 2 6 2 4 4" },
      { "period": 24, "name": "Maqam Sabr Jadid", "intervals": "3 3 2 6 2 6 2" }
      // etc, etc.
      // (source: https://en.xen.wiki/w/24edo)
    ]
  }
}
Custom colour schemes
To add your theme to the built-in themes, put a colourSchemes.json file in your projects directory. Here’s an example:
{
  "colourSchemes": {
    "colourScheme": [
      {
        "name": "Grayscale Light",
        "colourMap":
        {
          "text": "fff0f0f0",
          "headlineFill": "ff2d2d30",
          "pageFill": "ff2d2d30",
          "sidebarFill": "ff2d2d30",
          "dialogFill": "ff333333",
          "lassoFill": "25000000",
          "lassoBorder": "ffd4d4d4",
          "buttonFill": "18ffffff",
          "frameBorder": "ff585858",
          "whiteKey": "ff262626",
          "blackKey": "ff1e1e1e",
          "bar": "271b1923",
          "row": "ff1b1923",
          "timeline": "ff2d2d30",
          "iconBase": "27ffffff",
          "iconShadow": "ff000000"
        }
      }
    ]
  }
}
Hotkeys
This page simply lists sections of the default hotkeys configuration file. Hopefully the command names are descriptive enough.
If you don’t see any hotkeys here, you’re reading the markdown source of this page, please visit docs.helio.fm.
Hotkeys for all pages
  // Command Palette aka Spotlight Search aka Goto Anything:
  { "command": "CommandPalette", "key": "`" },
  { "command": "CommandPalette", "key": "Control + P" },
  { "command": "CommandPalette", "key": "Command + P" },
  { "command": "CommandPalette", "key": "Control + G" },
  { "command": "CommandPalette", "key": "Command + G" },

  // Quick access to command palette modes - /, :, !, @
  { "command": "CommandPaletteWithMode", "key": "/" },
  { "command": "CommandPaletteWithMode", "key": "Shift + 1" },
  { "command": "CommandPaletteWithMode", "key": "Shift + 2" },
  { "command": "CommandPaletteWithMode", "key": "Shift + ;" },

  { "command": "BreadcrumbsMenu", "key": "F10" },
  { "command": "BreadcrumbsMenu", "key": "Shift + /" },

  { "command": "ScriptingPlayground", "key": "Control + `" },
  { "command": "ScriptingPlayground", "key": "Command + `" },

  { "command": "ShowPreviousPage", "key": "Command + Cursor Left" },
  { "command": "ShowPreviousPage", "key": "Control + Cursor Left" },
  { "command": "ShowPreviousPage", "key": "Alt + Cursor Left" },
  { "command": "ShowNextPage", "key": "Command + Cursor Right" },
  { "command": "ShowNextPage", "key": "Control + Cursor Right" },
  { "command": "ShowNextPage", "key": "Alt + Cursor Right" },

  { "command": "SwitchToEditMode", "key": "Page Up" },
  { "command": "SwitchToArrangeMode", "key": "Page Down" },
  { "command": "SwitchToVersioningMode", "key": "Control + S" },
  { "command": "SwitchToVersioningMode", "key": "Command + S" }
Common hotkeys for editing and arranging
  { "command": "SwitchBetweenRolls", "key": "Tab" },

  { "command": "ExportMidi", "key": "Control + E" },
  { "command": "ExportMidi", "key": "Command + E" },

  { "command": "RenderToWAV", "key": "Control + R" },
  { "command": "RenderToWAV", "key": "Command + R" },
  { "command": "RenderToFLAC", "key": "Control + Shift + R" },
  { "command": "RenderToFLAC", "key": "Command + Shift + R" }
Piano roll
  // Undo/redo:
  { "command": "Undo", "key": "Command + Z" },
  { "command": "Undo", "key": "Control + Z" },
  { "command": "Redo", "key": "Command + Shift + Z" },
  { "command": "Redo", "key": "Control + Shift + Z" },
  { "command": "Redo", "key": "Command + Y" },
  { "command": "Redo", "key": "Control + Y" },

  // Copy
  { "command": "CopyEvents", "key": "Command + C" },
  { "command": "CopyEvents", "key": "Control + C" },
  { "command": "CopyEvents", "key": "Command + Insert" },
  { "command": "CopyEvents", "key": "Control + Insert" },

  // Cut
  { "command": "CutEvents", "key": "Command + X" },
  { "command": "CutEvents", "key": "Control + X" },
  { "command": "CutEvents", "key": "Shift + Delete" },

  // Cut selection to the new track
  { "command": "NewTrackFromSelection", "key": "Control + Shift + X" },
  { "command": "NewTrackFromSelection", "key": "Command + Shift + X" },

  // Delete
  { "command": "DeleteEvents", "key": "X" },
  { "command": "DeleteEvents", "key": "Delete" },
  { "command": "DeleteEvents", "key": "Backspace" },

  // Paste
  { "command": "PasteEvents", "key": "Command + V" },
  { "command": "PasteEvents", "key": "Control + V" },
  { "command": "PasteEvents", "key": "Shift + Insert" },

  // Playback/record control
  { "command": "TransportStop", "key": "Stop" },
  { "command": "TransportStop", "key": "Escape" },
  { "command": "TransportPlaybackStart", "key": "Play" },
  { "command": "TransportPlaybackStart", "key": "Return" },
  { "command": "TransportRecordingAwait", "key": "F12" },
  { "command": "TransportRecordingAwait", "key": "Control + Return" },
  { "command": "TransportRecordingAwait", "key": "Command + Return" },
  { "command": "TransportRecordingStart", "key": "Shift + Return" },
  { "command": "ToggleLoopOverSelection", "key": "F11" },

  // Navigation
  { "command": "ZoomIn", "key": "Z" },
  { "command": "ZoomOut", "key": "Shift + Z" },
  { "command": "ZoomEntireClip", "key": "Command + Tab" },
  { "command": "ZoomEntireClip", "key": "Control + Tab" },
  { "command": "ToggleLockZoomLevel", "key": "Alt + Z" },
  { "command": "TimelineJumpNext", "key": "." },
  { "command": "TimelineJumpPrevious", "key": "," },
  { "command": "TimelineJumpHome", "key": "Home" },
  { "command": "TimelineJumpEnd", "key": "End" },
  { "command": "ViewportPanLeft", "key": "Spacebar + Cursor Left" },
  { "command": "ViewportPanRight", "key": "Spacebar + Cursor Right" },
  { "command": "ViewportPanUp", "key": "Spacebar + Cursor Up" },
  { "command": "ViewportPanDown", "key": "Spacebar + Cursor Down" },
  { "command": "ViewportPanLeft", "key": "Spacebar + Numpad 4" },
  { "command": "ViewportPanRight", "key": "Spacebar + Numpad 6" },
  { "command": "ViewportPanUp", "key": "Spacebar + Numpad 8" },
  { "command": "ViewportPanDown", "key": "Spacebar + Numpad 2" },
  { "command": "ViewportPanLeft", "key": "Spacebar + H" },
  { "command": "ViewportPanRight", "key": "Spacebar + L" },
  { "command": "ViewportPanUp", "key": "Spacebar + K" },
  { "command": "ViewportPanDown", "key": "Spacebar + J" },
  { "command": "ViewportPanLeft", "key": "Control + H" },
  { "command": "ViewportPanRight", "key": "Control + L" },
  { "command": "ViewportPanUp", "key": "Control + K" },
  { "command": "ViewportPanDown", "key": "Control + J" },

  // Keyboard control
  { "command": "CursorMoveLeft", "key": "H" },
  { "command": "CursorMoveRight", "key": "L" },
  { "command": "CursorMoveUp", "key": "K" },
  { "command": "CursorMoveDown", "key": "J" },
  { "command": "CursorMoveLeft", "key": "Numpad 4" },
  { "command": "CursorMoveRight", "key": "Numpad 6" },
  { "command": "CursorMoveUp", "key": "Numpad 8" },
  { "command": "CursorMoveDown", "key": "Numpad 2" },
  { "command": "CursorSelectLeft", "key": "Shift + H" },
  { "command": "CursorSelectRight", "key": "Shift + L" },
  { "command": "CursorSelectUp", "key": "Shift + K" },
  { "command": "CursorSelectDown", "key": "Shift + J" },
  { "command": "CursorSelectLeft", "key": "Shift + Numpad 4" },
  { "command": "CursorSelectRight", "key": "Shift + Numpad 6" },
  { "command": "CursorSelectUp", "key": "Shift + Numpad 8" },
  { "command": "CursorSelectDown", "key": "Shift + Numpad 2" },
  { "command": "CursorEditHarmonicContext", "key": "F9" },
  { "command": "CursorEditTimeContext", "key": "Alt + F9" },
  { "command": "CursorInteract", "key": "I" },

  // Selection
  { "command": "SelectAllEvents", "key": "Command + A" },
  { "command": "SelectAllEvents", "key": "Control + A" },

  // Edit selection
  { "command": "ToggleMuteClips", "key": "M" },
  { "command": "ToggleSoloClips", "key": "S" },
  { "command": "ToggleMuteModifiers", "key": "Alt + M" },
  { "command": "RenameTrack", "key": "F2" },
  { "command": "SetTrackTimeSignature", "key": "Alt + F2" },
  { "command": "TempoUp1Bpm", "key": "Shift + +" },
  { "command": "TempoDown1Bpm", "key": "Shift + -" },
  { "command": "BeatShiftLeft", "key": "Cursor Left" },
  { "command": "BeatShiftRight", "key": "Cursor Right" },
  { "command": "LengthDecrease", "key": "Shift + Cursor Left" },
  { "command": "LengthIncrease", "key": "Shift + Cursor Right" },
  { "command": "TransposeUp", "key": "Cursor Up" },
  { "command": "TransposeDown", "key": "Cursor Down" },
  { "command": "TransposeScaleKeyUp", "key": "Alt + Cursor Up" },
  { "command": "TransposeScaleKeyDown", "key": "Alt + Cursor Down" },
  { "command": "TransposeOctaveUp", "key": "Shift + Cursor Up" },
  { "command": "TransposeOctaveDown", "key": "Shift + Cursor Down" },
  { "command": "TransposeFifthUp", "key": "Shift + Alt + Cursor Up" },
  { "command": "TransposeFifthDown", "key": "Shift + Alt + Cursor Down" },

  // Refactor selection
  { "command": "Retrograde", "key": "Alt + R" },
  { "command": "MelodicInversion", "key": "Alt + I" },
  { "command": "CleanupOverlaps", "key": "Alt + O" },
  { "command": "JoinAdjacent", "key": "Alt + J" },
  { "command": "MakeLegato", "key": "Alt + L" },
  { "command": "MakeStaccato", "key": "Alt + S" },
  { "command": "MakeStaccatissimo", "key": "Shift + Alt + S" },
  { "command": "AlignToScale", "key": "Alt + A" },
  { "command": "NotesVolumeUp", "key": "=" },
  { "command": "NotesVolumeUp", "key": "Shift + =" },
  { "command": "NotesVolumeUp", "key": "+" },
  { "command": "NotesVolumeDown", "key": "-" },
  { "command": "NotesVolumeRandom", "key": "Alt + =" },
  { "command": "NotesVolumeRandom", "key": "Alt + Shift + =" },
  { "command": "NotesVolumeRandom", "key": "Alt + +" },
  { "command": "NotesVolumeFadeOut", "key": "Alt + -" },
  { "command": "InvertChordUp", "key": "Control + Cursor Up" },
  { "command": "InvertChordUp", "key": "Command + Cursor Up" },
  { "command": "InvertChordDown", "key": "Control + Cursor Down" },
  { "command": "InvertChordDown", "key": "Command + Cursor Down" },

  // Multiplets
  { "command": "Tuplet1", "key": "Alt + 1" },
  { "command": "Tuplet2", "key": "Alt + 2" },
  { "command": "Tuplet3", "key": "Alt + 3" },
  { "command": "Tuplet4", "key": "Alt + 4" },
  { "command": "Tuplet5", "key": "Alt + 5" },
  { "command": "Tuplet6", "key": "Alt + 6" },
  { "command": "Tuplet7", "key": "Alt + 7" },
  { "command": "Tuplet8", "key": "Alt + 8" },
  { "command": "Tuplet9", "key": "Alt + 9" },

  // Quantization
  { "command": "QuantizeTo1_1", "key": "Control + 1" },
  { "command": "QuantizeTo1_2", "key": "Control + 2" },
  { "command": "QuantizeTo1_4", "key": "Control + 3" },
  { "command": "QuantizeTo1_8", "key": "Control + 4" },
  { "command": "QuantizeTo1_16", "key": "Control + 5" },
  { "command": "QuantizeTo1_32", "key": "Control + 6" },

  // Edit modes
  { "command": "EditModeDefault", "key": "1" },
  { "command": "EditModeDraw", "key": "2" },
  { "command": "EditModeKnife", "key": "3" },

  // Version control
  { "command": "VersionControlToggleQuickStash", "key": "Shift + Backspace" },

  // Panels
  { "command": "ShowArpeggiatorsPanel", "key": "A" },
  { "command": "CreateArpeggiatorFromSelection", "key": "Shift + A" },
  { "command": "ShowRescalePanel", "key": "R" },
  { "command": "ShowChordPanel", "key": "C" },

  // Other toggles
  { "command": "ToggleNoteNameGuides", "key": "G" },
  { "command": "ToggleShowMidiNumbers", "key": "Shift + G" },
  { "command": "ToggleBottomMiniMap", "key": "B" },
  { "command": "ToggleVolumePanel", "key": "V" },
  { "command": "ToggleMetronome", "key": "Control + M" },
  { "command": "ToggleMetronome", "key": "Command + M" },

  // Various
  { "command": "DuplicateTrack", "key": "F5" },
  { "command": "SwitchToClipInViewport", "key": "F3" },
  { "command": "EditCurrentInstrument", "key": "F4" },
  { "command": "EditCurrentInstrumentRouting", "key": "Shift + F4" },
  { "command": "EditCurrentInstrumentKeymap", "key": "Control + Shift + F4" }
Pattern roll
  // Undo/redo
  { "command": "Undo", "key": "Command + Z" },
  { "command": "Undo", "key": "Control + Z" },
  { "command": "Redo", "key": "Command + Shift + Z" },
  { "command": "Redo", "key": "Control + Shift + Z" },
  { "command": "Redo", "key": "Command + Y" },
  { "command": "Redo", "key": "Control + Y" },

  // Delete clips
  { "command": "DeleteClips", "key": "X" },
  { "command": "DeleteClips", "key": "Delete" },
  { "command": "DeleteClips", "key": "Backspace" },

  // Playback control
  { "command": "TransportStop", "key": "Stop" },
  { "command": "TransportStop", "key": "Escape" },
  { "command": "TransportPlaybackStart", "key": "Play" },
  { "command": "TransportPlaybackStart", "key": "Return" },
  { "command": "TransportRecordingStart", "key": "Shift + Return" },
  { "command": "TransportRecordingAwait", "key": "Control + Return" },
  { "command": "TransportRecordingAwait", "key": "Command + Return" },
  { "command": "TransportRecordingAwait", "key": "F12" },
  { "command": "ToggleLoopOverSelection", "key": "F11" },

  // Navigation
  { "command": "ZoomIn", "key": "Z" },
  { "command": "ZoomOut", "key": "Shift + Z" },
  { "command": "ZoomEntireClip", "key": "Command + Tab" },
  { "command": "ZoomEntireClip", "key": "Control + Tab" },
  { "command": "ToggleLockZoomLevel", "key": "Alt + Z" },
  { "command": "TimelineJumpNext", "key": "." },
  { "command": "TimelineJumpPrevious", "key": "," },
  { "command": "TimelineJumpHome", "key": "Home" },
  { "command": "TimelineJumpEnd", "key": "End" },
  { "command": "ViewportPanLeft", "key": "Spacebar + Cursor Left" },
  { "command": "ViewportPanRight", "key": "Spacebar + Cursor Right" },
  { "command": "ViewportPanUp", "key": "Spacebar + Cursor Up" },
  { "command": "ViewportPanDown", "key": "Spacebar + Cursor Down" },
  { "command": "ViewportPanLeft", "key": "Spacebar + Numpad 4" },
  { "command": "ViewportPanRight", "key": "Spacebar + Numpad 6" },
  { "command": "ViewportPanUp", "key": "Spacebar + Numpad 8" },
  { "command": "ViewportPanDown", "key": "Spacebar + Numpad 2" },
  { "command": "ViewportPanLeft", "key": "Spacebar + H" },
  { "command": "ViewportPanRight", "key": "Spacebar + L" },
  { "command": "ViewportPanUp", "key": "Spacebar + K" },
  { "command": "ViewportPanDown", "key": "Spacebar + J" },
  { "command": "ViewportPanLeft", "key": "Control + H" },
  { "command": "ViewportPanRight", "key": "Control + L" },
  { "command": "ViewportPanUp", "key": "Control + K" },
  { "command": "ViewportPanDown", "key": "Control + J" },

  // Keyboard control
  { "command": "CursorMoveLeft", "key": "H" },
  { "command": "CursorMoveRight", "key": "L" },
  { "command": "CursorMoveUp", "key": "K" },
  { "command": "CursorMoveDown", "key": "J" },
  { "command": "CursorMoveLeft", "key": "Numpad 4" },
  { "command": "CursorMoveRight", "key": "Numpad 6" },
  { "command": "CursorMoveUp", "key": "Numpad 8" },
  { "command": "CursorMoveDown", "key": "Numpad 2" },
  { "command": "CursorSelectLeft", "key": "Shift + H" },
  { "command": "CursorSelectRight", "key": "Shift + L" },
  { "command": "CursorSelectUp", "key": "Shift + K" },
  { "command": "CursorSelectDown", "key": "Shift + J" },
  { "command": "CursorSelectLeft", "key": "Shift + Numpad 4" },
  { "command": "CursorSelectRight", "key": "Shift + Numpad 6" },
  { "command": "CursorSelectUp", "key": "Shift + Numpad 8" },
  { "command": "CursorSelectDown", "key": "Shift + Numpad 2" },
  { "command": "CursorEditHarmonicContext", "key": "F9" },
  { "command": "CursorEditTimeContext", "key": "Alt + F9" },
  { "command": "CursorInteract", "key": "I" },

  // Selection
  { "command": "SelectAllClips", "key": "Command + A" },
  { "command": "SelectAllClips", "key": "Control + A" },

  // Quantization
  { "command": "QuantizeTo1_1", "key": "Control + 1" },
  { "command": "QuantizeTo1_2", "key": "Control + 2" },
  { "command": "QuantizeTo1_4", "key": "Control + 3" },
  { "command": "QuantizeTo1_8", "key": "Control + 4" },
  { "command": "QuantizeTo1_16", "key": "Control + 5" },
  { "command": "QuantizeTo1_32", "key": "Control + 6" },

  // Edit modes
  { "command": "EditModeDefault", "key": "1" },
  { "command": "EditModeDraw", "key": "2" },
  { "command": "EditModeKnife", "key": "3" },

  // Grouping
  { "command": "PatternsGroupByName", "key": "Q" },
  { "command": "PatternsGroupByColour", "key": "W" },
  { "command": "PatternsGroupByInstrument", "key": "E" },
  { "command": "PatternsGroupById", "key": "R" },

  // Version control
  { "command": "VersionControlToggleQuickStash", "key": "Shift + Backspace" },

  // Edit selection
  { "command": "ToggleMuteClips", "key": "M" },
  { "command": "ToggleSoloClips", "key": "S" },
  { "command": "ToggleMuteModifiers", "key": "Alt + M" },
  { "command": "RenameTrack", "key": "F2" },
  { "command": "SetTrackTimeSignature", "key": "Alt + F2" },
  { "command": "TempoUp1Bpm", "key": "Shift + +" },
  { "command": "TempoDown1Bpm", "key": "Shift + -" },
  { "command": "ClipVolumeUp", "key": "=" },
  { "command": "ClipVolumeUp", "key": "Shift + =" },
  { "command": "ClipVolumeUp", "key": "+" },
  { "command": "ClipVolumeDown", "key": "-" },
  { "command": "ClipTransposeUp", "key": "Cursor Up" },
  { "command": "ClipTransposeDown", "key": "Cursor Down" },
  { "command": "ClipTransposeOctaveUp", "key": "Shift + Cursor Up" },
  { "command": "ClipTransposeOctaveDown", "key": "Shift + Cursor Down" },
  { "command": "ClipTransposeFifthUp", "key": "Shift + Alt + Cursor Up" },
  { "command": "ClipTransposeFifthDown", "key": "Shift + Alt + Cursor Down" },
  { "command": "BeatShiftLeft", "key": "Cursor Left" },
  { "command": "BeatShiftRight", "key": "Cursor Right" },
  { "command": "Retrograde", "key": "Alt + R" },

  // Various
  { "command": "ToggleBottomMiniMap", "key": "B" },
  { "command": "ToggleVolumePanel", "key": "V" },
  { "command": "ToggleMetronome", "key": "Control + M" },
  { "command": "ToggleMetronome", "key": "Command + M" },
  { "command": "DuplicateTrack", "key": "F5" },
  { "command": "InstanceToUniqueTrack", "key": "F6" },
  { "command": "EditCurrentInstrument", "key": "F4" },
  { "command": "EditCurrentInstrumentRouting", "key": "Shift + F4" },
  { "command": "EditCurrentInstrumentKeymap", "key": "Control + Shift + F4" }
Version control page
  { "command": "VersionControlSelectAll", "key": "Control + A" },
  { "command": "VersionControlSelectNone", "key": "Escape" },
  { "command": "VersionControlCommitSelected", "key": "Return" },
  { "command": "VersionControlResetSelected", "key": "Backspace" },
  { "command": "VersionControlResetSelected", "key": "Delete" },
  { "command": "VersionControlCommitAll", "key": "Shift + Return" },
  { "command": "VersionControlCommitAll", "key": "Shift + Return" },
  { "command": "VersionControlResetAll", "key": "Shift + Backspace" },
  { "command": "VersionControlResetAll", "key": "Shift + Delete" },
  // Stash all changes or apply stashed changes
  { "command": "VersionControlToggleQuickStash", "key": "Tab" }
Menus and modal components
  { "command": "MenuDismiss", "key": "Escape" },
  { "command": "MenuDismiss", "key": "F10" },
  { "command": "MenuDismiss", "key": "Shift + /" },
  { "command": "MenuSelect", "key": "Return" },
  { "command": "MenuSelect", "key": "Spacebar" },
  { "command": "MenuSelect", "key": "I" },
  { "command": "MenuCursorUp", "key": "Cursor Up" },
  { "command": "MenuCursorDown", "key": "Cursor Down" },
  { "command": "MenuCursorPageUp", "key": "Page Up" },
  { "command": "MenuCursorPageDown", "key": "Page Down" },
  { "command": "MenuForward", "key": "Cursor Right" },
  { "command": "MenuBack", "key": "Cursor Left" },
  { "command": "MenuCursorUp", "key": "K" },
  { "command": "MenuCursorDown", "key": "J" },
  { "command": "MenuForward", "key": "L" },
  { "command": "MenuBack", "key": "H" },
  { "command": "MenuBack", "key": "Backspace" }
  { "command": "DialogDismissCancel", "key": "Escape" },
  { "command": "DialogDismissApply", "key": "Return" },
  { "command": "DialogDismissDelete", "key": "Shift + Delete" },
  { "command": "DialogNextPreset", "key": "Page Down" },
  { "command": "DialogPreviousPreset", "key": "Page Up" },
  { "command": "DialogPreviewPreset", "key": "Alt + Return" },
  { "command": "DialogPreviewPreset", "key": "Control + Return" },
  { "command": "DialogPreviewPreset", "key": "Command + Return" },
  { "command": "DialogPreviewPreset", "key": "Shift + Return" },
  { "command": "DialogPreviewPreset", "key": "Play" },
  { "command": "DialogStopPreviewPreset", "key": "Stop" },
  { "command": "DialogShowPresetsList", "key": "Tab" }
  { "command": "ComboDismissCancel", "key": "Tab" },
  { "command": "ComboDismissCancel", "key": "Escape" },
  { "command": "ComboDismissApply", "key": "Return" },
  { "command": "ComboCursorUp", "key": "Cursor Up" },
  { "command": "ComboCursorDown", "key": "Cursor Down" },
  { "command": "ComboCursorPageUp", "key": "Page Up" },
  { "command": "ComboCursorPageDown", "key": "Page Down" }
  { "command": "CommandPaletteClear", "key": "Escape" },
  { "command": "CommandPaletteDismiss", "key": "`" },
  { "command": "CommandPaletteDismiss", "key": "Control + P" },
  { "command": "CommandPaletteDismiss", "key": "Command + P" },
  { "command": "CommandPaletteDismiss", "key": "Control + G" },
  { "command": "CommandPaletteDismiss", "key": "Command + G" },
  { "command": "CommandPaletteCursorUp", "key": "Cursor Up" },
  { "command": "CommandPaletteCursorDown", "key": "Cursor Down" },
  { "command": "CommandPaletteCursorPageUp", "key": "Page Up" },
  { "command": "CommandPaletteCursorPageDown", "key": "Page Down" }
  { "command": "ScriptingPlaygroundDismiss", "key": "Escape" },
  { "command": "ScriptingPlaygroundDismiss", "key": "Control + `" },
  { "command": "ScriptingPlaygroundDismiss", "key": "Command + `" },
  { "command": "ScriptingPlaygroundRunScript", "key": "F5" },
  { "command": "ScriptEditorToggleComment", "key": "Control + /" },
  { "command": "ScriptEditorToggleComment", "key": "Command + /" },
  { "command": "ScriptEditorSelectNext", "key": "F3" },
  { "command": "ScriptEditorSelectPrevious", "key": "Shift + F3" }
Troubleshooting
This page will collect known issues and workarounds. If you find any more, please share.
Fonts
To fix font issues, particularly for Chinese/Japanese/Korean translations, install the Noto CJK font and select it on the settings page.
The app will try to use Noto CJK by default if it’s already installed. If not, the app will also look for the fonts YeHei, Hei, and Heiti SC for Chinese or Japanese translations, and Dotum for Korean translation.
Plugin scanning
On desktop platforms, plugins are scanned in a separate process to avoid crashes (even while scanning, some plugins may crash for a variety of reasons).
On Linux, for plugin scanning to work, the app needs to be launched with an absolute path so that it can see it’s own executable file. This already already should be the case in most distributions.
LV2 plugins
You need to place LV2 plugins in the proper directories for your OS. E.g. for Windows it is %APPDATA%\LV2\ or %COMMONPROGRAMFILES%\LV2\. On Windows 10 it is %APPDATA%\Roaming\LV2\. On Linux, it is /usr/lib/lv2/, /usr/local/lib/lv2/ or a directory mentioned in your LV2_PATH environment variable.
See also: the Ardour documentation for plugin directories.
iOS issues
The iOS file picker will allow you to select either the app’s local folder or the iCloud folder, if available. Keep all your projects, as well as SoundFonts and metronome samples, in the app’s local folder.
The iCloud folder should only be used for one-time actions like importing/exporting MIDI or rendering WAV/FLAC audio. Due to the iOS security model, the folder will not be accessible across sessions.
Sidebar cut-off
Some mobile devices have a display notch or a frontal camera cutout, partially covering either of the sidebars, depending on which orientation you’re using. To workaround this, sidebars allow dragging them sideways a bit:
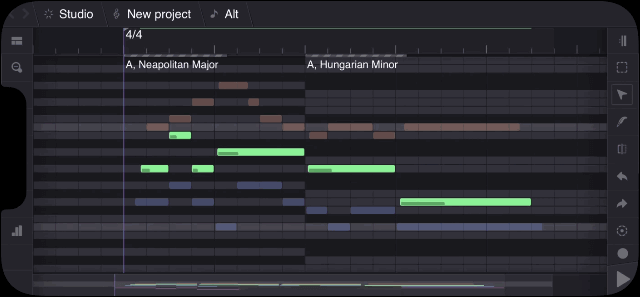
Sidebar positions are remembered between sessions.
Building from source
- If you experience the error:
'exchange' is not a member of 'std', add#include <utility>toJUCE/modules/juce_core/system/juce_StandardHeader.hin the appropriate place. This is an issue pending resolution with the JUCE library, and is probably not a problem with your compiler. - Be sure to clone the repository with recursive mode enabled so that the ThirdParty folder is pre-populated with the necessary files. Alternatively, add them yourself by going to their respective repositories.
- If you experience build errors, make sure you have all required dependencies installed in your system.