Getting started
UI overview
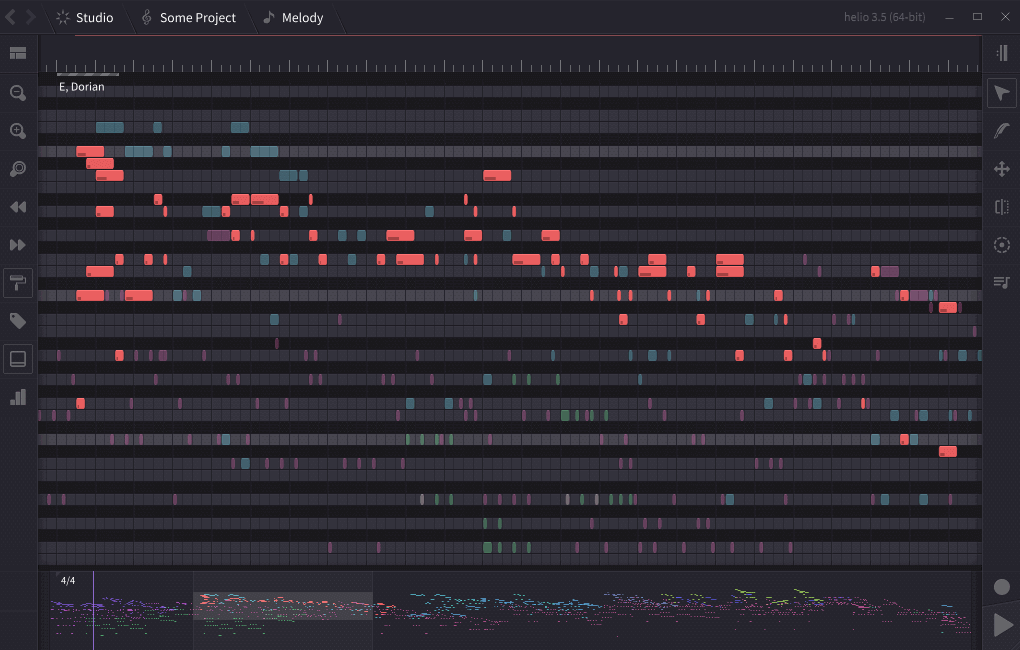
This is how the sequencer page looks like in Helio, as of version 3. There are other pages besides this, but you’ll spend majority of your time in the sequencer.
The UI is divided into the following sections:
- the breadcrumb navigation control is on the top,
- the editor canvas is in the middle,
- the project mini-map is on the bottom,
- the track navigation tools are in the left sidebar,
- the editing tools are in the right sidebar.
They will be described below, but, before you dive in,
A little backstory and a couple of silly excuses
This project arose from the need for an advanced MIDI editor, something like Sublime Text for music.
I was also sick and tired of visual overstimulation, which most music tools tend to have more and more (just google some pictures for “digital audio workstation”). One of my main goals was to create a tool that feels right: one with an uncluttered and non-distractive user interface.
So, in general, I try to avoid adding UI controls if there is a way to do without them. As it turned out, though, there are a couple of challenges with that approach (for which I don’t see simple solutions, UX design is hard):
- one challenge is to keep the UI simple, even minimalistic, while also not being disorienting,
- another challenge is to keep the UI look and behave consistently across all platforms, both desktop and mobile.
If something feels misleading to you, please report it to help identify the main friction points.
Workspace navigation
The breadcrumb control on the top is responsible for navigating the workspace.
All items in the breadcrumb control have their own context menus. The Studio root node contains all available pages and open projects:
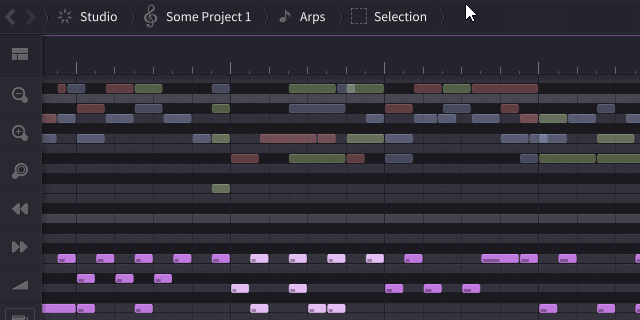
Workspace structure
Breadcrumbs show the hierarchy of the current page you’re on.
Under the hood, the workspace is a tree-like structure that looks like this:
- Dashboard for the projects list, a fancy logo, and a couple of buttons
- Settings for choosing a language, audio drivers, playing with UI flags, etc
- Orchestra pit for managing plugins and instruments on the stage
- Instrument 1 page for setting up audio/MIDI routing for all plugins in your instrument
- Instrument 2 page and so on
- Project 1 page for the basic project info: title, author, etc
- Piano roll for editing
- Pattern roll for arranging
- Version control page
- Project 2 page
- Piano roll
- ..and so on
Creating a Project
When you first launch Helio, you should see a simple example project open in the editor. Here are a few steps that can help you get started:
- to rename the project, click
Example Projectin the breadcrumb control, and you’ll be taken to the project info page, where you can edit some details, - after renaming, return to the piano roll page by pressing
Alt + Left Arrowor by pressing the back button on the top left. - you can only edit one track at a time: use right-click (or long tap on mobile) to switch to another track; holding any modifier key while switching will also adjust the zoom level so that the entire track fits the viewport,
- to play with arrangement, switch to the pattern roll by pressing
TaborPage Down, or by clicking the uppermost button in the left sidebar, - double-click any clip to return to the piano roll with that clip in focus; at this point you should get an idea of how the sequencer layout works.
To start a new project from scratch, go to the dashboard by pressing the Home key, or clicking the Studio node in the breadcrumbs. There you’ll see a list of recent projects, and a couple of buttons:
- create an empty project,
- open an existing project (this also imports MIDI files).
Switching between projects
There are several ways:
- use the
/hotkey to display the projects list in the command palette, - or hover the
Studioitem in the breadcrumb control to display a menu with all open projects, - the back and forward buttons are also useful at times; the associated hotkeys are
Alt + Cursor LeftandAlt + Cursor Right.
Instruments
Instruments management
The most notable difference between Helio’s instrument management and that of the majority of DAWs and sequencers is that Helio separates instruments from projects.
Each project only stores the instrument references, so the instrument settings are saved in the application workspace settings rather than the project files.
Instruments are created and set up in a separate page, called Orchestra Pit.
The reason for implementing it this way was that in my workflow, I tend to use the same instruments for all of my projects. The app was designed primarily as a sketching and prototyping tool, and I usually have lots of sketches, so all the operations involving switching between projects, opening and closing them, or checking out in the version control, were ought to be as fast as possible, and not eat up all the memory.
Helio is probably not the best choice if your setup requires you to always have different instruments or instrument settings for each project, or if you want the project file to contain the instrument details.
On the other hand, if you happen to have an instrument library you’re comfortable with (e.g. VSL or a selected soundfonts collection), and you want to set it up once and forget it, you’ll probably like this approach.
Orchestra pit page
The orchestra pit page has two sections:
- all found plugins are displayed on the left side,
- all instruments on stage, created from those plugins, are on the right.
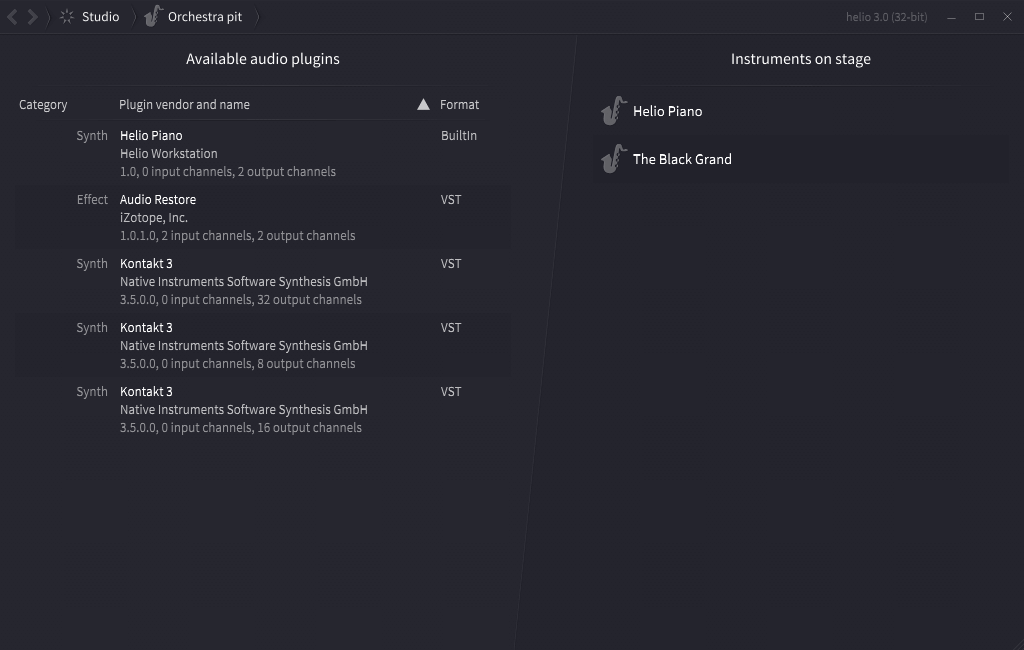
First, you want to scan for available plugins, there are two options in the orchestra pit menu:
- either pick a specific folder to scan (note that all subfolder will be scanned as well),
- or perform a global plugins scan: it tries to guess the most possible locations, e.g. Steinberg folders in Program Files, and scans them and all their subfolders.
Once you have a list of plugins, create an instrument using the plugin menu, so that it appears on the stage and can be assigned to your tracks.
Instrument details and routing
Double-click on any of the instruments to get to the instrument details page.
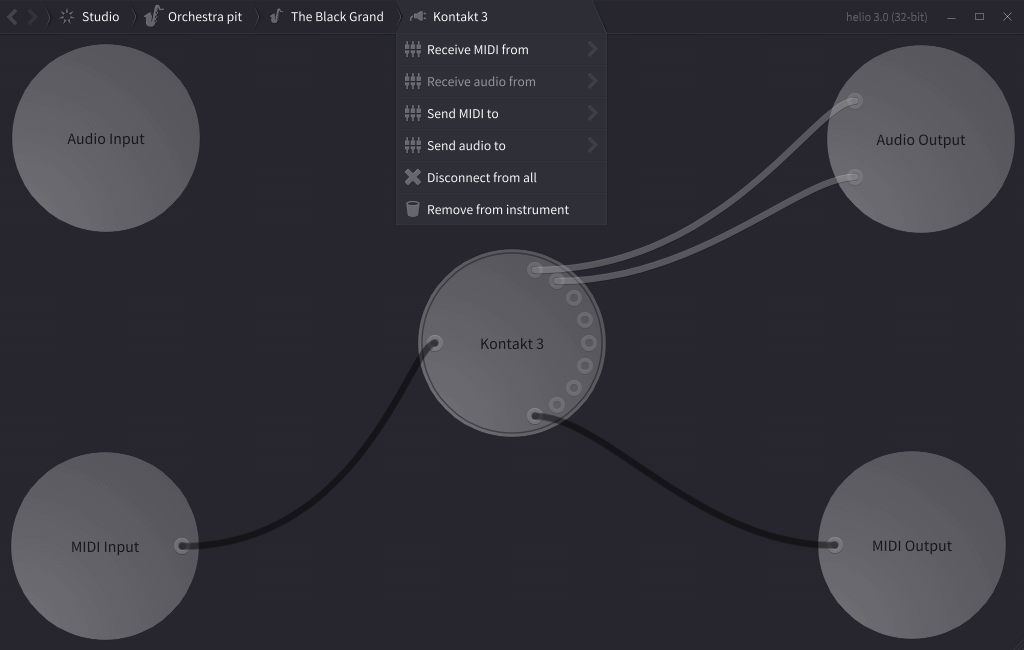
Most of the actions here, including audio and MIDI routing, are available through the menus.
Interacting with nodes:
- left-click on the node will create a plugin window, it it has one, or just select it, if it doesn’t,
- right-click on the node will just select it,
- use mouse drag to connect sockets representing audio and MIDI inputs and outputs.
While it is possible to set up a multi-plugin instrument with audio/MIDI routing in Helio, the convenience of the instrument page was not of a particular concern: the development is rather focused on the sequencer functionality. If you are running it under Linux, it might be a good idea to add Carla as an instrument, and use it to manage VST/whatever plugins and routing.
Default instruments
A few built-in instruments are created automatically and cannot be removed:
- the “Helio Default” instrument is a simple sine wave voice that supports all built-in temperaments with no setup; aside from being the default instrument, it is used to preview scales in the key signature dialog,
- the “MIDI Output” instrument generates no sound but sends all events, except meta-events, to the MIDI output specified on the settings page,
- the “Metronome” instrument gives you the option to select custom metronome samples.
Apart from those, Helio includes the built-in SoundFont player instrument which can be found in the plugins list after scanning. It can load SF2 format and SF3 format with OGG/FLAC sample compression and supports microtonal temperaments. On mobile platforms it will be automatically added to the orchestra pit on the first launch.
Editing and arranging
Timeline
On the top of the editor canvas, there’s a timeline control. To interact with it:
- left click at the timeline to position the playhead,
- middle-click to start the playback from that position,
- right click to invoke the timeline events menu:

Timeline events include annotations, key signatures and time signatures, and they don’t affect the playback of your piece in any way, they are rather meant to provide a visual cue.
Manipulating the timeline events:
- click on any event to focus the playhead at its position,
- once focused, click again to edit or delete the event (displays a dialog),
- drag to move, or shift-drag to duplicate the event.
Annotations
Annotations are just text markers with optionally adjustable length:

Right-click on the annotation selects all notes of the active track up to the next annotation.
Time signatures
Time signatures simply define the way the vertical grid lines are aligned in the roll:

Right-click on the time signature selects all notes of the active track up to the next time signature.
If you need to manage complex rhythms, see this page.
Key signatures
Key signatures affect the way the rows are highlighted in the piano roll (this effect can be disabled on the setting page):
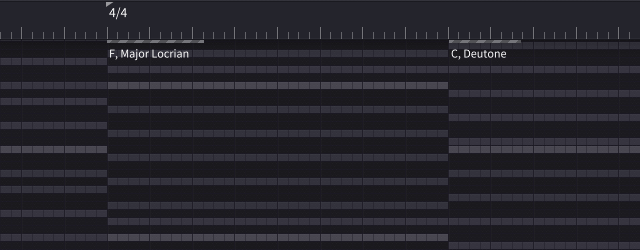
Key signatures also affect note naming, and various tools like arpeggiators and the chord tool rely on key signatures to figure out the harmonic context.
A key signature is a combination of the root key and the scale:
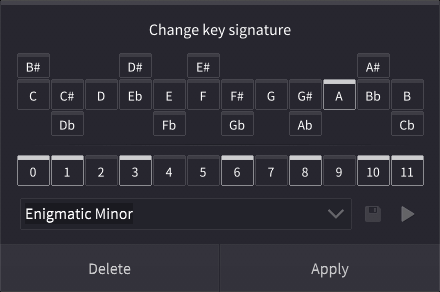
Tip: right-click on any key button to preview it.
The root key selection allows you to pick one of the key’s enharmonic equivalents, which only affects note naming to provide better compatibility with traditional notation language.
A scale is defined as a subset of the current temperament’s octave keys. While this is not the same as how traditional notation defines, say, diatonic scales, this approach is flexible and makes more sense for the piano roll.
Reprise
If you have enabled the playback loop over the selected scope, timeline will display the repeat signs:

The reprise also affects rendering to audio, it can be used as a hack to render a few bars of the project.
Left sidebar
This sidebar is responsible for track navigation and UI control.
Most buttons on the sidebars have keyboard shortcuts, which makes them kinda redundant, but they are displayed anyway for the sake of having a consistent UI on mobiles or touch-screen laptops, where you don’t have hotkeys.
 — switch the editor view between the piano roll and the pattern roll (
Tab), — zoom out (
Shift + Z), zoom in (Z), and zoom selection (Control + Tab), — lock the current zoom level(
Alt + Z), — jump over the timeline events (
,and.), — toggle the volume/automation editors (
V), — toggle displaying note name guides for a visual cue,
 — a simple audio output view.
Right sidebar
This sidebar is responsible for editing tools and playback control:
 — toggle the playback loop over the selection (
F11), — edit modes (
1,2,3), — undo/redo,
 — other tools - the chord tool, arpeggiators(if available), and metronome,
 — playback (
SpaceorEnter) and recording (F12) control.
Piano roll
The piano roll always limits the editable scope to a single track. You will see all other tracks in a semi-transparent ghost mode. Most common interactions with the piano roll canvas are:
- right-click (or long-tap) on the inactive note to focus the editor to another track,
- right-drag the empty space to pan the canvas:

Interacting with piano roll also depends on the current edit mode:
Edit modes
- normal mode to manage selection and edit notes,
- pen mode to add and edit notes,
- alternatively, use it to delete notes or clips with right mouse button,
- knife mode: cuts notes in the piano roll, cuts tracks in the pattern roll,
- alternatively, use it to merge tracks or notes with right mouse button,
- drag-only mode: an auxiliary mode, hold
Spaceto toggle it temporarily, - selection mode is only displayed on mobile platforms.
All notes, when edited, are aligned to the grid. The grid resolution (the density of bar lines) depends on the zoom level and supports up to 1/64 notes. Tip: holding Alt while editing notes disables snapping to the grid.
All edits are undoable, and there is no limit to the number of undo actions available until the app is restarted. Additionally, each project saves the last 16 undo actions (32 on mobile platforms), which remain undoable after restarting the app. This limit can be changed by editing the main configuration file.
All changes are saved automatically: on exit, and on a timeout after the last change.
The editor relies heavily on hotkeys; feel free to explore available actions by browsing breadcrumb control menus or command palette.
Adding new tracks
Add new tracks by duplicating the existing ones (F5), or via project menu, or by cutting tracks with the knife tool in the pattern roll.
Volume and automation editors
The bottom panel (toggled by V hotkey) combines the volume editor and the automation editor:

(the piano roll allows you to manually switch between volume and automation tracks, while the pattern roll switches the editor type based on the selected clip)
The volume editor, like the piano roll, restricts its editable scope to the active clip. Furthermore, if any notes in the roll are selected, the editable scope is limited to the selection, making it easier to fine-tune and draw more complex ramps for different sections of the track. On mobile platforms, this panel is the main way to edit volume; on desktop platforms, you can also adjust note volumes in the piano roll using the middle mouse button and the + and - hotkeys on the numpad.
The automation editor’s editable scope is limited to the active clip and the selected controller. The active clip is determined by the pattern roll’s selection or by the closest range intersection with the piano roll’s active clip.
Unlike automation clips in the pattern roll, the automation editor allows you to use the pen tool to hand-draw custom curves for curve automations.
Both the volume editor and the automation editor currently only support the default edit mode and the pen tool (no selection or knife tool).
MIDI recording
The record button (hotkey F12) will try to auto-detect the available and enabled MIDI input device, or will provide a selection if there are multiple (the choice is “remembered” and can be changed later in the settings page):

If the recording mode is on, but playback has not yet started, it will wait until it receives the first MIDI event and start recording & playback.
In the piano roll mode, it always records to the selected track/clip:

In the pattern roll, it either records to the selected track/clip, or if no piano clip is selected, it adds one once the recording begins.
Pattern roll
You don’t necessarily need that editor, Helio was designed to be a hybrid linear-based/pattern-based sequencer, so you could just stay in the piano roll mode and treat your project as one big canvas.
However, the pattern roll is helpful for rearranging experiments:
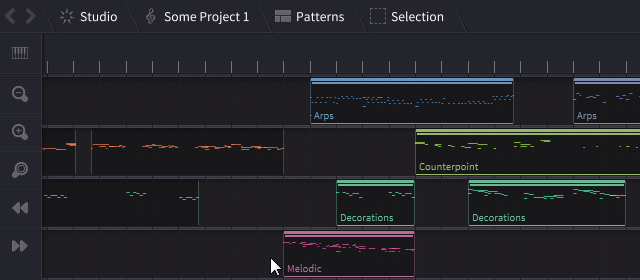
Pattern roll allows you to tweak individual clip parameters: change key offsets and velocity multipliers, or apply parametric modifiers to different instances of the same track.
A hack: I often shift the key offset for all clips as a trick to reset my mental state to notice nuances I wasn’t noticing while working on the piece.
See also: track grouping
Global tempo
Pattern roll is also where you can edit various MIDI controller automation tracks, most notably the tempo track(s):

The tempo track, as any other automation track, interpolates the controller value between nodes, and those tiny points are displayed at the exact times each new MIDI event is sent.
To interact with it:
- delete nodes with right click,
- use the pen tool (hotkey
2) to add nodes, - use the cursor tool (hotkey
1) to drag nodes or to adjust the interpolation curve, - click on the node to invoke the tempo dialog to set the exact BPM value, or to set tempo by tapping:
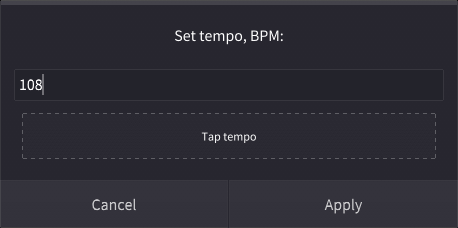
Tip: use the mouse wheel to quickly adjust the tempo in this dialog.
Tip: adding a tempo node while holding any mod key will immediately open the tempo dialog.
Often, you only need one tempo for the whole song - for that, pick “Set one tempo” menu item from the tempo track menu or the project refactoring menu.
Tip: use Shift + and Shift - hotkeys to shift tempo tracks 1 BPM up or down. It affects all selected tempo tracks in the pattern roll, and all tempo tracks in the piano roll.
Mute and solo
Individual clips can be muted via the M hotkey or the context menu in the pattern roll.
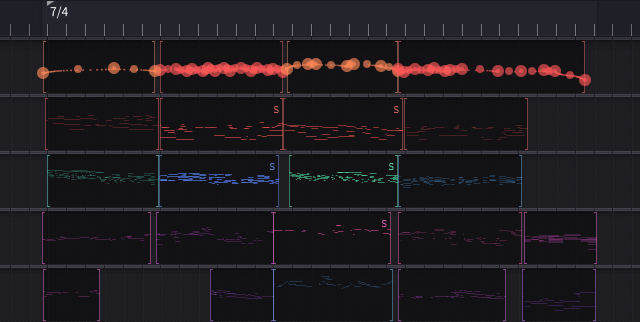
Except for automation, all clips can be soloed (with the S hotkey or via the context menu) for the convenience of isolating chunks of notes without disabling the tempo/pedal/etc. automation at the same time.
All clips that are explicitly or implicitly muted (muted by others) are displayed as dimmed:
Version control
The concept of version control comes from the software development world. If you’re not familiar with it, you can think of it as of creating “save points” in your project, and tracking changes made since the last time you saved.
The point of having a version control is lowering the friction of committing changes: any changes can be reset if you don’t like them, any saved revision can be restored later. Helio was started as a prototyping tool, a playground for ideas, where you’d want to have several variations of your sketch — hence the idea of having a built-in version control.
Notable use cases are:
- saving a project state at some point, and resetting to any earlier saved state,
- resetting some of the recent changes (think of it as of another mechanism of undoing things),
- hiding and restoring back the most recent changes to get the idea of what have been done since the last commit,
- synchronizing projects across devices.
The UI of the versions page is split in two parts:
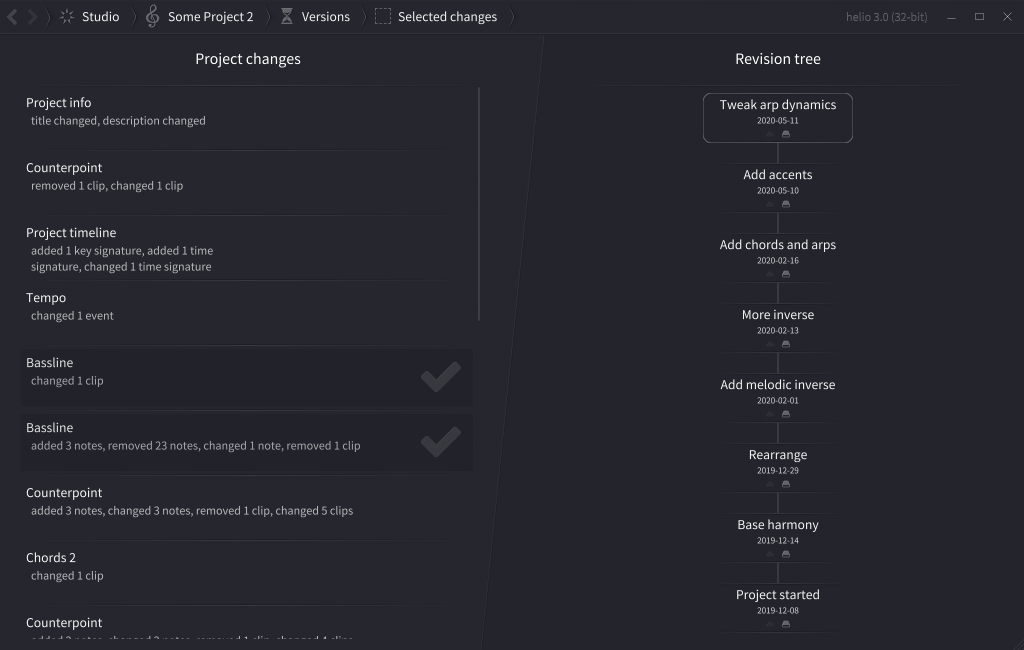
The left side lists all changes in the project, compared to the current revision. Items in the list can be checked and unchecked: both committing and resetting changes are applied selectively.
The right side shows the tree of all revisions that you have saved. Note a couple of icons under each revision: they indicate whether the revision is available locally, or remotely, or both.